Table of contents
- Lab Steps
- Task 1: Sign in to AWS Management Console
- Task 2: Create an Amazon VPC
- Task 3: Create a Public subnet
- Task 4: Create and attach an Internet Gateway
- Task 5: Create a Public Route Table and associate it with the subnet
- Task 6: Add public Route in the Route table
- Task 7: Create a security Group
- Task 8: Launch an EC2 instance
- Task 9: Understand the security group rules
- Task 10 : Understand the NACL rules
- Task 11: Validation Test
- Task 12: Delete AWS Resources
- Completion and Conclusion
- End Lab
Lab Steps
Task 1: Sign in to AWS Management Console
Click on the open console button, and you will get redirected to AWS Console in a new browser tab.
On the AWS sign-in page,
Leave the Account ID as default. Never edit/remove the 12 digit Account ID present in the AWS Console. otherwise, you cannot proceed with the lab.
Now copy your User Name and Password in the Lab Console to the IAM Username and Password in AWS Console and click on the Sign in button.
Once Signed In to the AWS Management Console, Make the default AWS Region as US East (N. Virginia) us-east-1.
Task 2: Create an Amazon VPC
Make sure you are in the N.Virginia Region.
Navigate to VPC by clicking on the Services menu in the top left, then click on VPC in the Networking & Content Delivery section.
Navigate to Your VPCs on the left panel and click on the Create VPC button.
Name tag : Enter AWS_VPC
IPv4 CIDR block : Enter 10.0.0.0/16
Leave everything else as default and click on the Create VPC button.
You have successfully created the VPC

Task 3: Create a Public subnet
Navigate to Subnets from the left side menu and click on Create subnet button.
VPC ID : Select the AWS_VPC VPC from the list.
Subnet name : Enter Public_subnet
Availability Zone : Select No Preference
IPv4 CIDR block : Enter 10.0.1.0/24
Now click on the Create subnet button.

Task 4: Create and attach an Internet Gateway
Navigate to the Internet Gateways from the left side menu and click on the Create Internet Gateway button.
- Name tag : Enter AWS_IGW
Click on the Create Internet Gateway button.

Now click on the Actions button and select Attach to VPC.
- Available VPCs : select AWS_VPC from the list.
Now click on the Attach internet gateway button.

Task 5: Create a Public Route Table and associate it with the subnet
Navigate to Route Tables on the left side panel and click on the Create route table button.
Name tag : Enter PublicRT
VPC : Select the AWS_VPC from the list.
Now click on the Create button and then click on Close button.
Select the PublicRT from the list and go to the Subnet Associations tab in below.
Click on the Edit subnet associations button.
Now select the subnet with the name Public Subnet and click on the Save associations button.
Task 6: Add public Route in the Route table
Navigate to Route tables on the left side panel and select the PublicRT from the list.
Go to the Routes tab in below and click on the Edit routes button.
Now click on the Add route button.
Destination : Enter 0.0.0.0/0
Target : select Internet Gateway and then select the Internet Gateway id.

- Click on the Save routes button and click on Close.
Task 7: Create a security Group
Navigate to Security Groups on the left side panel, under Security.
Click on the Create security group button.
We are going to create a Security group with no Inbound and Outbound rules.
Security group name : Enter EC2_SG
Description: Enter Security group for EC2 Instance
VPC: Select AWS_VPC

Under Inbound, leave everything as default
Under Outbound, Click on the Delete Button to remove the All traffic Route.
- Leave everything as default and click on the Create security group button.
Task 8: Launch an EC2 instance
Navigate to EC2 by clicking on the Services menu in the top left, then click on EC2 in the Compute section.
Navigate to Instances from the left side menu and click on Launch Instances button.
Under the Name and tags section :
- Name : MyEC2Instance

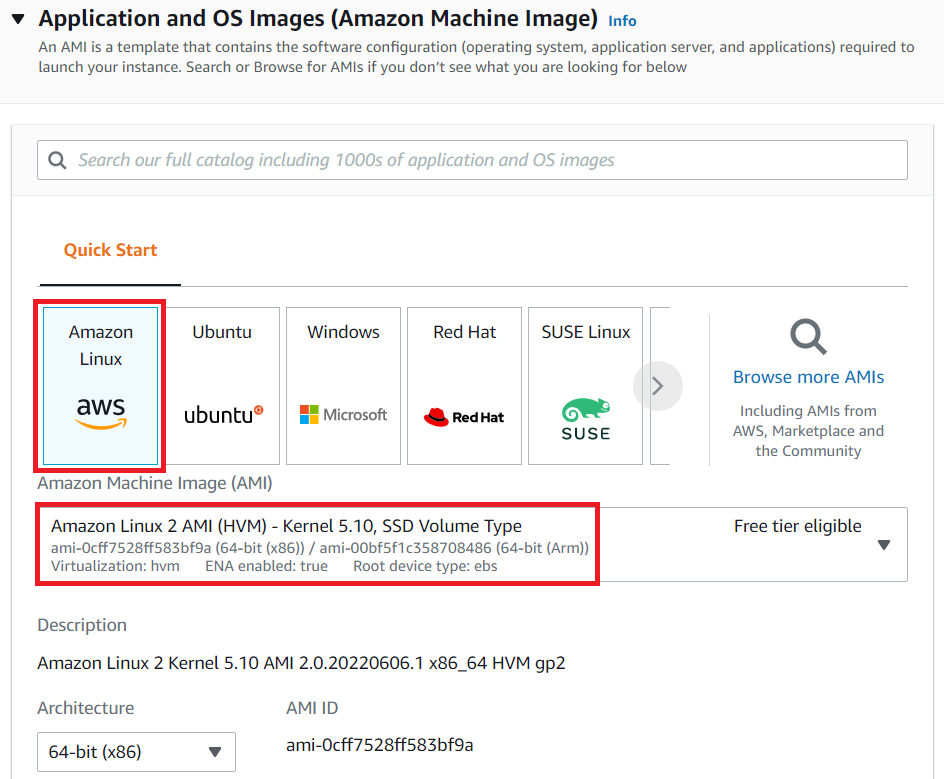
- Under the Application and OS Images (Amazon Machine Image) section :
Select Quick Start tab and Amazon Linux under it
Amazon Machine Image (AMI) : select Amazon Linux 2 AMI

Under the Instance Type section :
- Instance Type : Select t2.micro

- Under the Key Pair (login) section :
Click on Create new key pair hyperlink
Key pair name: EC2_Public_key
Key pair type: RSA
Private key file format: .pem or .ppk
Click on Create key pair and select the created key pair
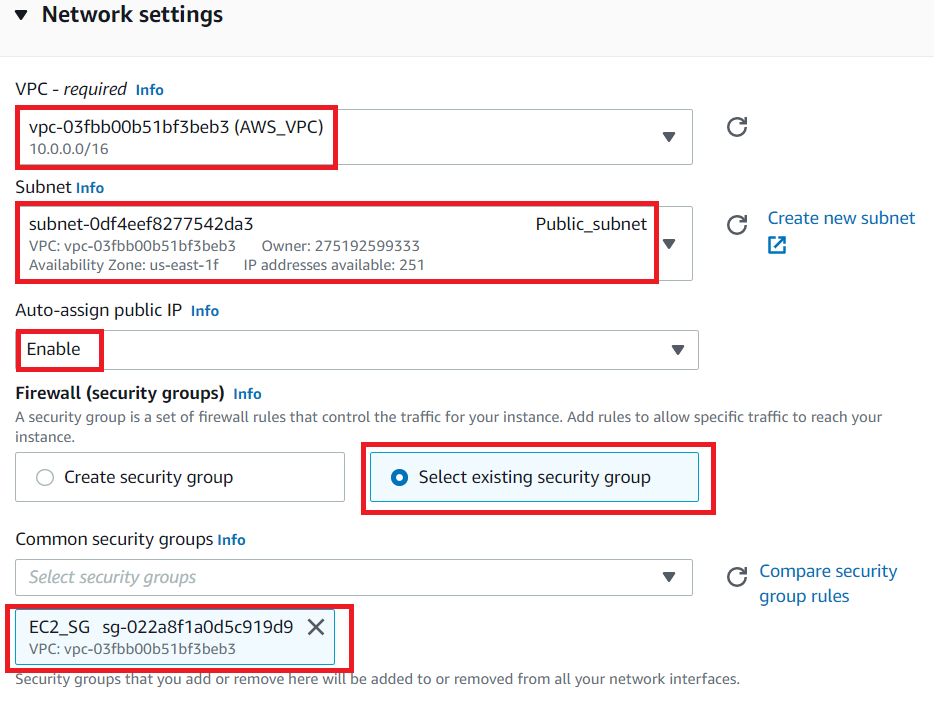
- Under the Network Settings section :
Click on Edit button
Remove the existing default VPC and add VPC with name AWS_VPC
Auto-assign public IP: select Enable
Firewall (security groups) : Select Select existing security group
Common security groups : Select Security group with name **EC2_SG
**

Keep everything else as default and click on the Launch instance button.
Launch Status: Your instance is now launching, Navigate to Instances page from the left menu and wait until the status of the EC2 Instance changes to running.
Note down the sample IPv4 Public IP Address of the EC2 instance and place it in your text editor. A sample is shown in the screenshot below.

Task 9: Understand the security group rules
- Follow the steps to SSH into EC2 Instance but you won't be able to SSH into the EC2 instance because in the Security group you haven’t added any rules.

Navigate to Security Groups on the left side panel, under Network & Security.
Select the EC2_SG security group from the list, click on Actions and select Edit inbound rules.
Click on the Add rule button.
- Type select SSH and Source select Custom and enter 0.0.0.0/0 in the textbox.
Click on the Save rules button.
Now again try to SSH into EC2 Instance and you will be able to successfully SSH into the EC2 Instance.

Since you have added the SSH Port in the Inbound of the EC2 Instance, all the SSH requests that originate from client side to server will be allowed.
Now try to ping google.com
ping google.com
- The ping won't work because the security group outbound has no rules added.

Navigate to Security Groups on the left side panel, under Network & Security.
Select the EC2_SG security group from the list, click on Actions and select Edit outbound rules.
Click on the Add rule button.
- Type select All traffic and Source select Custom and enter 0.0.0.0/0 in the textbox.
Click on the Save rules button.
Now navigate back to the EC2 instance terminal and you can again try to ping the google.com

The ping works because now we have enabled all the traffic that initiates from the server to any destination is allowed.
Stop the ping :
- [ctrl] + c or [control] + c
Now close the EC2 terminal.
Task 10 : Understand the NACL rules
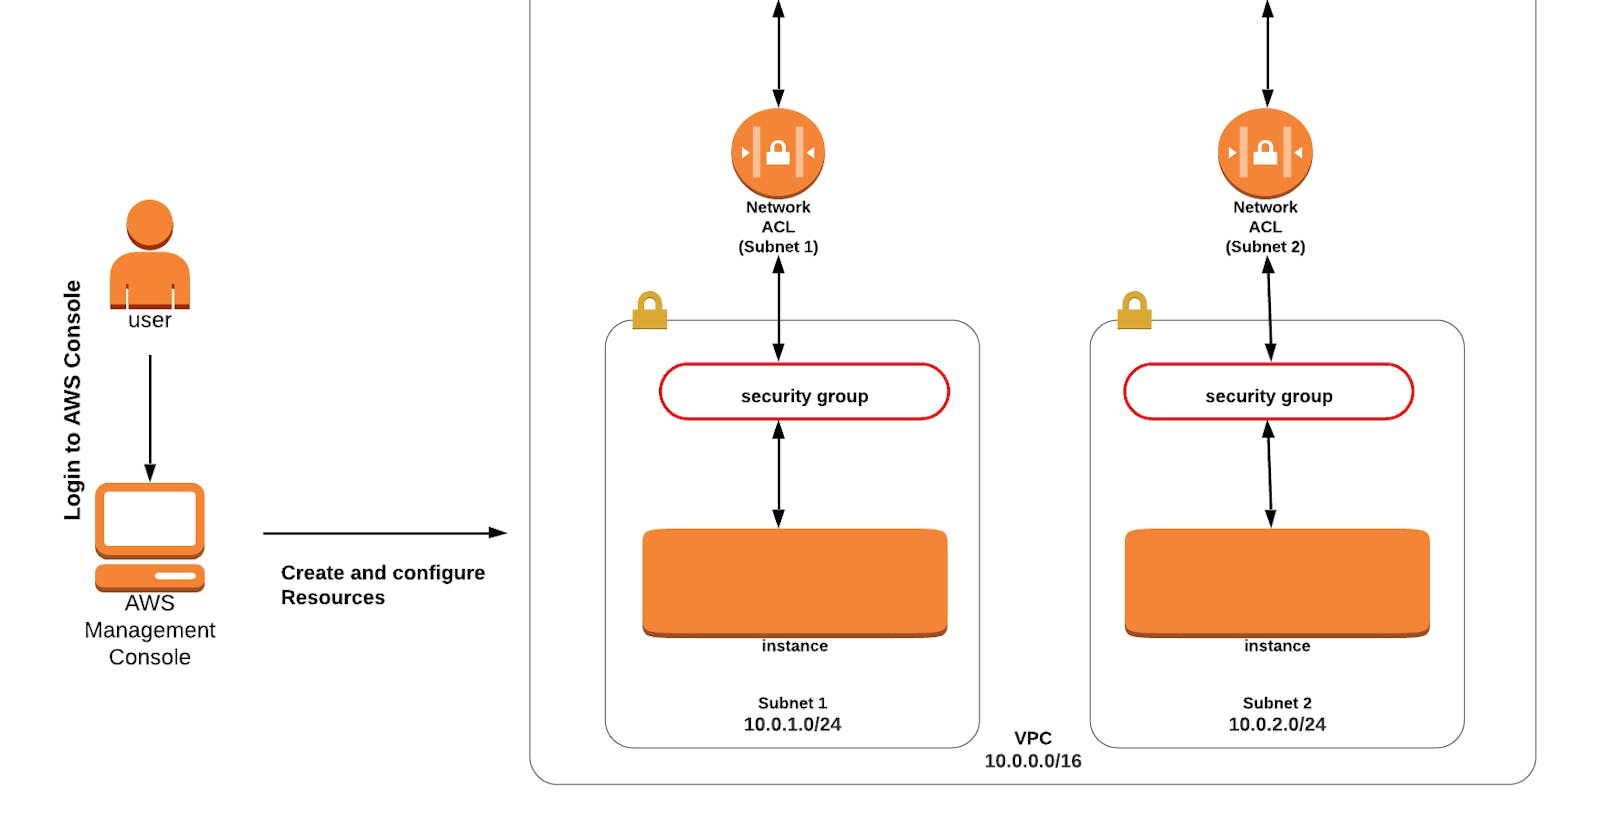
When you create a VPC, a default Network ACL is created that allows both inbound and outbound.
Navigate to VPC by clicking on the Services menu in the top, then click on VPC in the Networking & Content Delivery section.
Navigate to Network ACLs on the left panel.
Select the NACL from the list which says the VPC ID as AWS_VPC.

Now click on Actions and select Edit inbound rules.
Click on the Remove button to remove Rule Number 100 and then click on Save changes.
Similarly select the same NACL and click on Actions and select Edit outbound rules .
Click on the Remove button to remove Rule Number 100 and then click on Save changes.
Follow the steps to SSH into EC2 Instance but you won't be able to SSH into the EC2 instance because in the NACL you haven’t added any rules.

Navigate to Network ACLs on the left panel.
Select the NACL from the list which says the VPC ID as AWS_VPC.
Now click on Actions and select Edit inbound rules.
Click on the Add new rule button.
Rule Number : Enter 100
Type : Select SSH(22)
Source : Enter 0.0.0.0/0
Allow/Deny : Select Allow
Click on Save changes.
Now again try to SSH into EC2 Instance, still the SSH fails because the ssh request reaches the EC2 instances but the response fails because the NACL outbound does not allow any traffic.
Navigate to Network ACLs on the left panel.
Select the NACL from the list which says the VPC ID as AWS_VPC.
Now click on Actions and select Edit outbound rules.
Click on the Add new rule button.
Rule Number : Enter 100
Type : Select Custom TCP
Port range : Enter 1024-65535
Source : Enter 0.0.0.0/0
Allow/Deny : Select Allow
Click on Save changes.
Here we are enabling the ephemeral port range because the client request will come from one of these ports.
Now again try to SSH into EC2 Instance, and its success.

In Network ACL, if ports are enabled in both inbound and outbound then only the connection will be successful.
Navigate to Network ACLs on the left panel.
Select the NACL from the list which says the VPC ID as AWS_VPC.
Now click on Actions and select Edit inbound rules.
Click on the Add new rule button.
Rule Number : Enter 200
Type : Select ALL ICMP - IPv4
Source : Enter 0.0.0.0/0
Allow/Deny : Select Allow
Click on Save changes.
Now click on Actions and select Edit outbound rules.
Click on the Add new rule button.
Rule Number : Enter 200
Type : Select ALL ICMP - IPv4
Source : Enter 0.0.0.0/0
Allow/Deny : Select Allow
Click on Save changes.
Now try to ping google.com
ping google.com

Stop the ping :
- [ctrl] + c or [control] + c
Do You know?
NACL rules are evaluated based on their rule numbers in ascending order. The lowest numbered rule that matches the traffic takes precedence. When a rule matches, the action specified in that rule (allow or deny) is applied, and no further rule evaluation occurs for that particular traffic.
Task 11: Validation Test
Once the lab steps are completed, please click on the Validation button on the left side panel.
This will validate the resources in the AWS account and displays whether you have completed this lab successfully or not.
Sample output :

Task 12: Delete AWS Resources
Deleting EC2 Instance
Make sure you are in the US East (N. Virginia) Region.
Navigate to EC2 by clicking on the Services menu in the top, then click on EC2 under the Compute section.Now select the EC2 instance that you have created, click on the Instance State and click on the Terminate instance option.
Click on Terminate button and your EC2 will start terminating.
Completion and Conclusion
You have successfully created an Amazon VPC.
You have successfully created a Public subnet.
You have successfully created and attached an Internet Gateway.
You have successfully created a Public Route Table and associated it with the subnet.
You have successfully added the public Route in the Route table.
You have successfully created a Security group.
You have successfully launched an EC2 instance.
You have successfully understood security group rules.
You have successfully created a Network ACL.
You have successfully understood NACL rules.
End Lab
Sign out of AWS Account.
You have successfully completed the lab.
