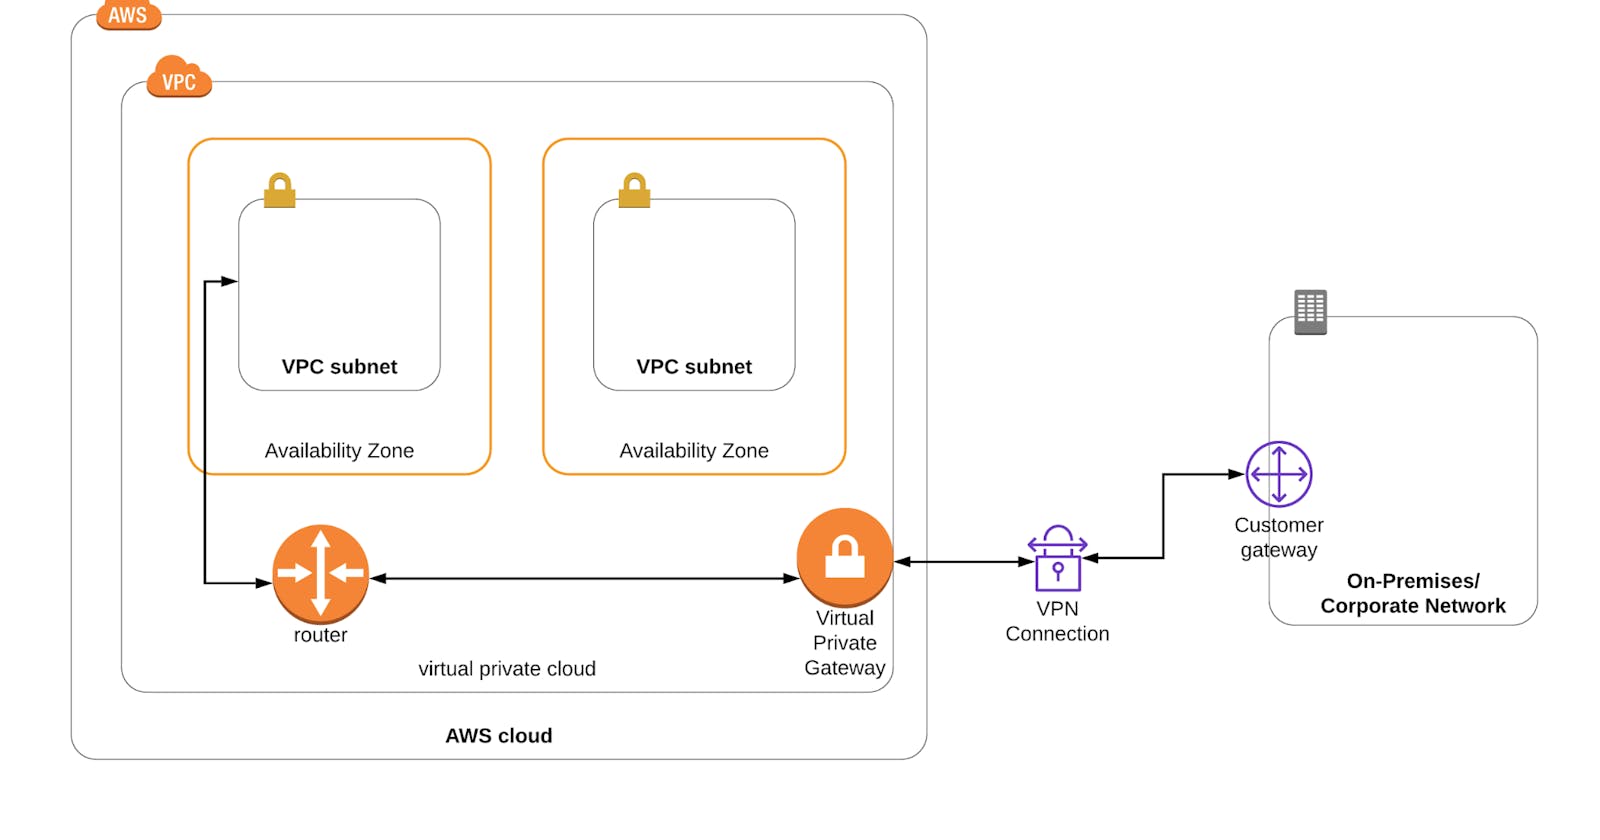
Table of contents
- Task 1: Sign in to AWS Management Console
- Task 2: Create a VPC in the Mumbai Region
- Task 3: Create a Public subnet
- Task 4: Create and attach an Internet Gateway
- Task 5: Create a Public Route Table and associate it with the subnet
- Task 6: Add public Route in the Route table
- Task 7: Launch an EC2 instance
- Task 8: Create a VPC in N.Virginia Region
- Task 9: Create a Private subnet
- Task 10: Launch an EC2 instance
- Task 11: Create a Customer Gateway in N.Virginia Region
- Task 12: Create a Virtual Private Gateway in N.Virginia Region
- Task 13: Create a Site-to-Site VPN connection
- Task 14: Configure On-Premises Router
- Task 15: Test the connectivity between two Networks
- Do You Know ?
- Task 16: Validation Test
- Task 17: Delete AWS Resources
- Deleting EC2 Instance in N.Virginia region
- Deleting EC2 Instance Mumbai region
- Completion and Conclusion
- End Lab
Task 1: Sign in to AWS Management Console
Click on the Open Console button, and you will get redirected to AWS Console in a new browser tab.
On the AWS sign-in page,
Leave the Account ID as default. Never edit/remove the 12 digit Account ID present in the AWS Console. otherwise, you cannot proceed with the lab.
Now copy your User Name and Password in the Lab Console to the IAM Username and Password in AWS Console and click on the Sign in button.
Once Signed In to the AWS Management Console, Make the default AWS Region as US East (N. Virginia) us-east-1.
Task 2: Create a VPC in the Mumbai Region
Make sure you are in the Mumbai Region.
Navigate to VPC by clicking on the Services menu in the top, then click on VPC in the Network & Content Delivery section.
Navigate to Your VPC's on the left panel and click on the Create VPC.
Select VPC only
Name tag : Enter On_Premises_Network
IPv4 CIDR block : Enter 10.0.0.0/16
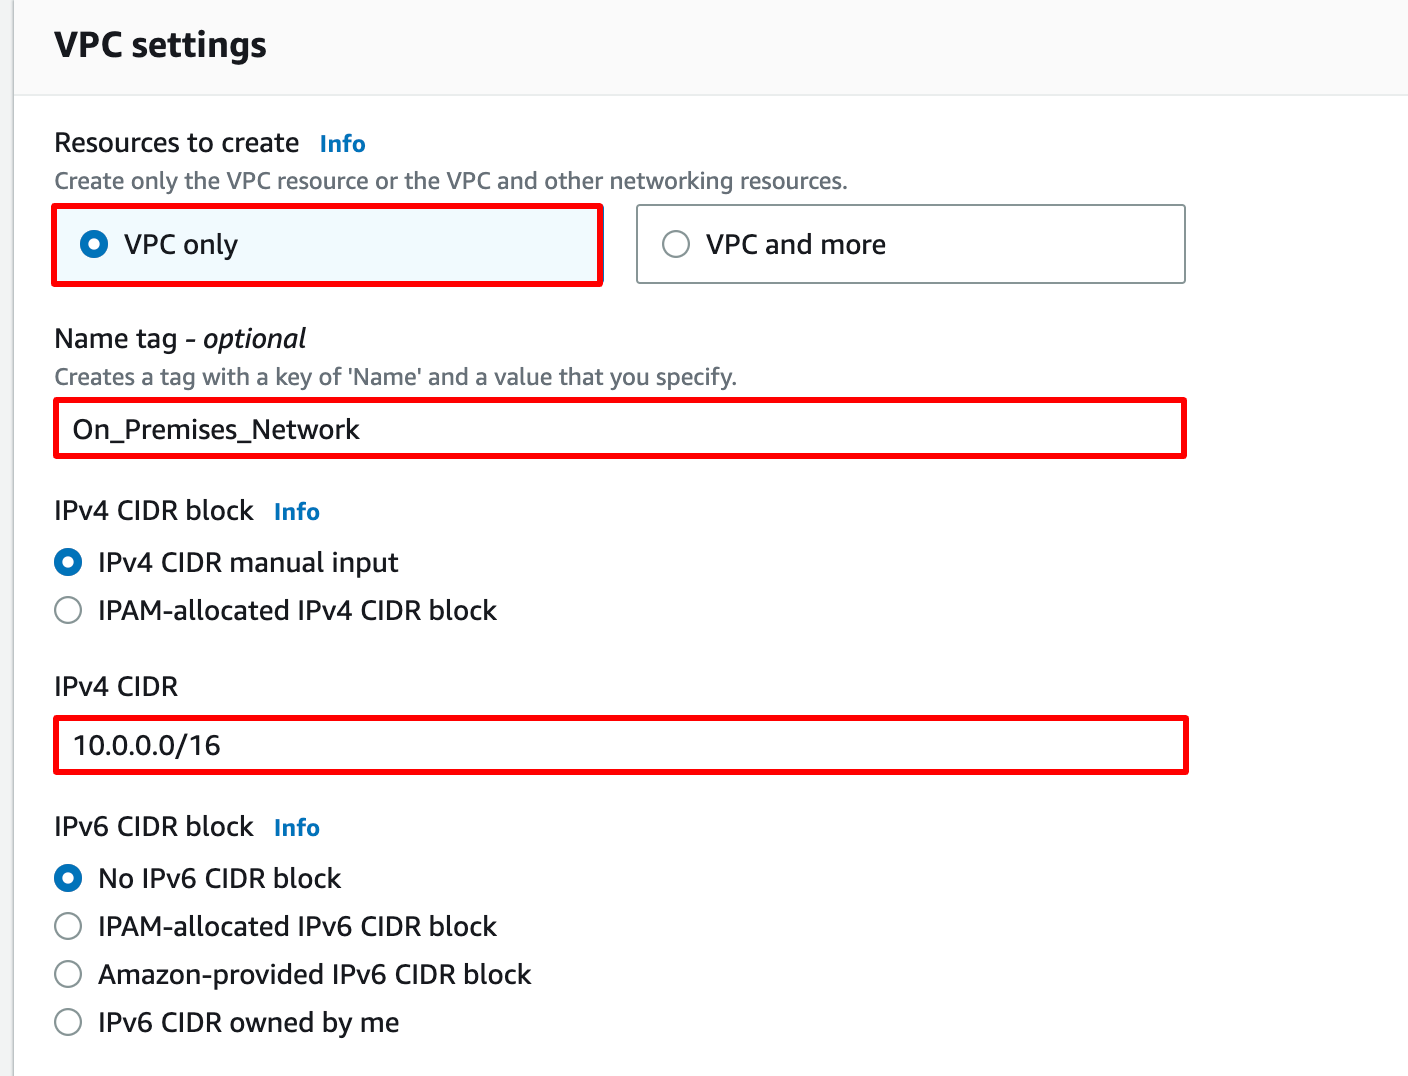
Leave everything else as default and click on the Create VPC.
You have successfully created the VPC

Task 3: Create a Public subnet
Navigate to Subnets from the left side menu and click on Create Subnet.
VPC ID : Select the On_Premises_Network VPC from the list.
Subnet name : Enter Public_subnet
Availability Zone : Select ap-south-1a
IPv4 CIDR block : Enter 10.0.1.0/24
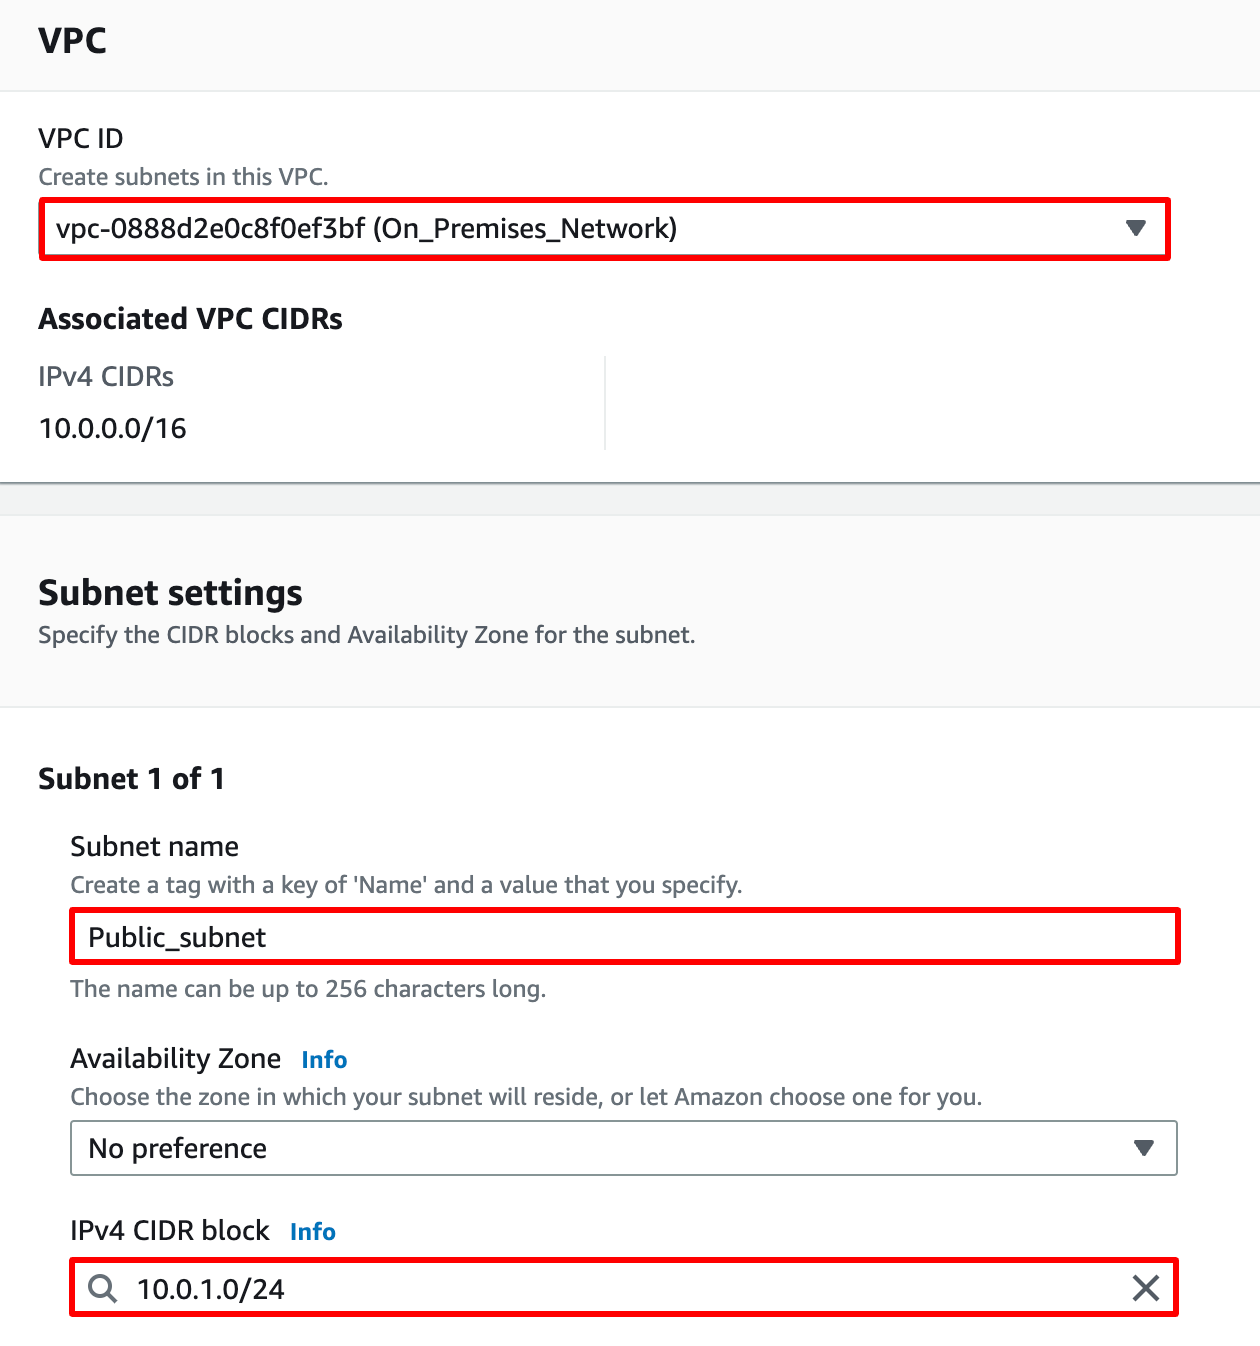
Note : In the Mumbai region select ap-south-1a, because in other regions t2.micro EC2 launch may fails.
- Now click on the Create Subnet

Task 4: Create and attach an Internet Gateway
Navigate to the Internet Gateways new from the left side menu and click on the Create Internet Gateway
- Name tag : Enter On_Premises_IGW
Click on the Create Internet Gateway
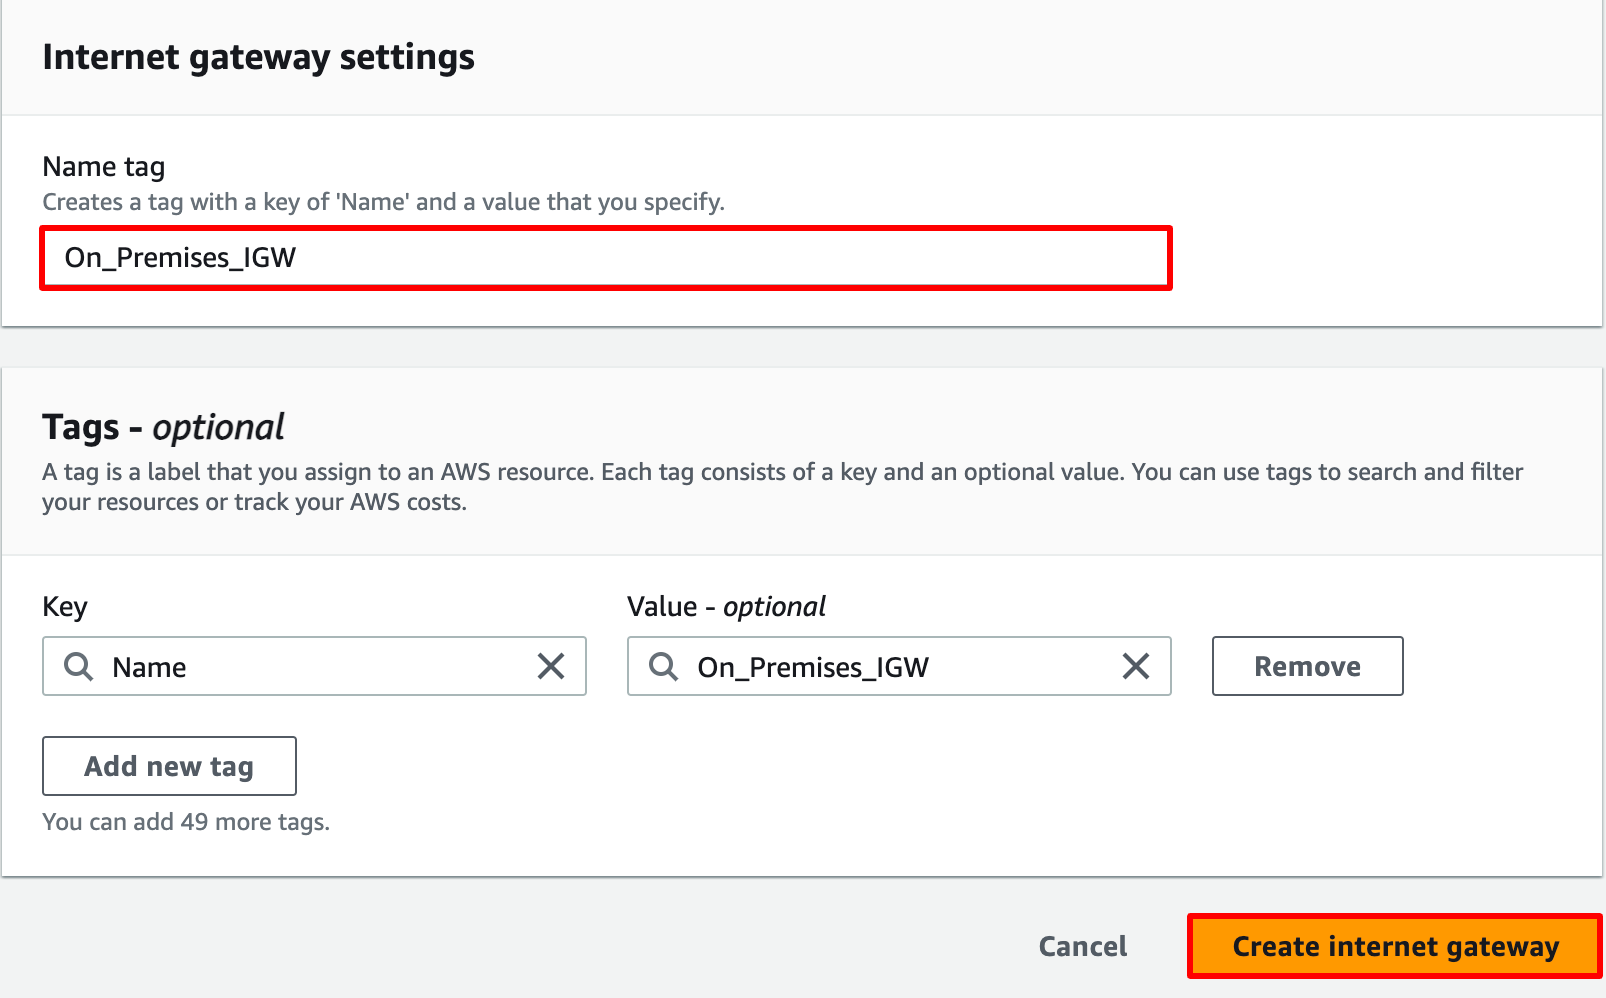
Now click on the Actions and select Attach to VPC.
- Available VPCs : select On_Premises_Network from the list.
Now click on the Attach Internet Gateway

Task 5: Create a Public Route Table and associate it with the subnet
Navigate to Route Tables on the left side panel and click on the Create route table button.
Name tag : Enter PublicRT
VPC* : Select the On_Premises_Network from the list.
Now click on the Create route table button.
Now click on Route Tables in the left panel and select the PublicRT from the list and go to the Subnet associations tab in below.
Click on the Edit subnet associations button.
Now select the subnet Public_subnet and click on the Save associations button.

Task 6: Add public Route in the Route table
Navigate to Route Tables on the left side panel and select the PublicRT from the list.
Go to the Routes tab in below and click on the Edit routes button.
Now click on the Add route button.
Destination : Enter 0.0.0.0/0
Target : select Internet Gateway and then select the Internet Gateway id.

- Click on the Save changes button.
Task 7: Launch an EC2 instance
Make sure you are in the Mumbai Region.
We will be launching this EC2 instance to act as an Public Router in On-Premises Network, for that we will be installing Openswan later in this lab.
Navigate to EC2 by clicking on the Services menu in the top, then click on EC2 in the Compute section.
Navigate to Instances from the left side menu and click on Launch Instances
Enter Name as On_Premises_Router
Choose an Amazon Machine Image (AMI): Search for Amazon Linux 2 AMI in the search box and click on the select button.
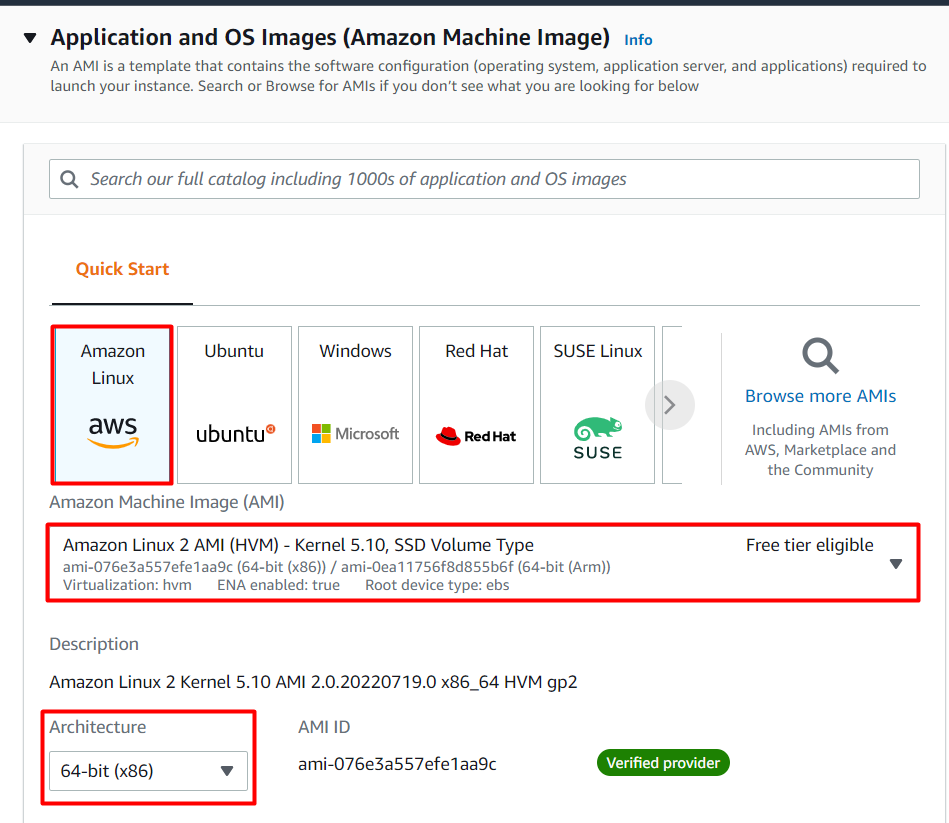
Choose an Instance Type: select **t2.micro
**

Key Pair : Choose Create a new key Pair from the dropdown list.
Key pair name : Enter Router-key
Key Pair Type: Select RSA
Click on Create key pair button to download the key to your local machine.
Under Network Settings, click on Edit button.
Network : Select On_Premises_Network
Subnet : leave as default
Auto-assign Public IP : Select Enable
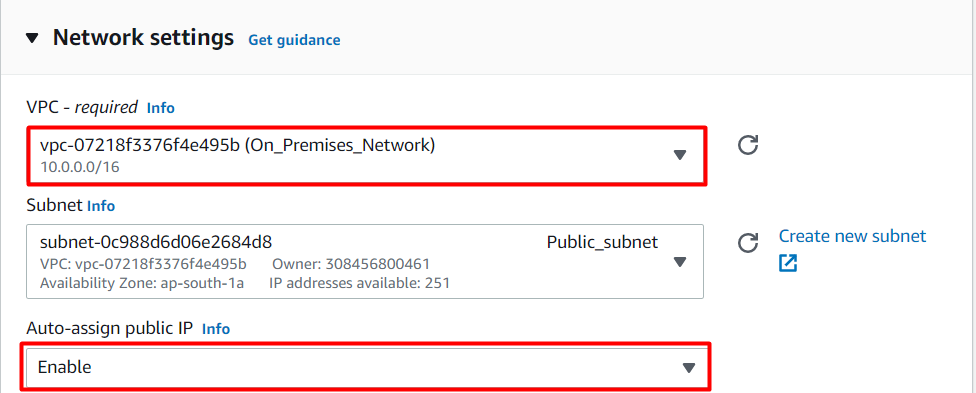
Configure Security Group:
Firewall(security groups) : Select Create a new security group
Security group name : Enter On_Premises_Router_SG
Description : Enter Security group for public Router
To add SSH,
Choose Type: SSH
Source: Anywhere (From ALL IP addresses accessible).
For All TCP,
Click on Add Security group rule button.
Choose Type: All TCP
Source: Custom and Enter 30.0.0.0/16 in the textbox.
For IPv4 ICMP,
Click on Add Security group rule button.
Choose Type: All ICMP - IPv4
Source: Custom and Enter 30.0.0.0/16 in the textbox.
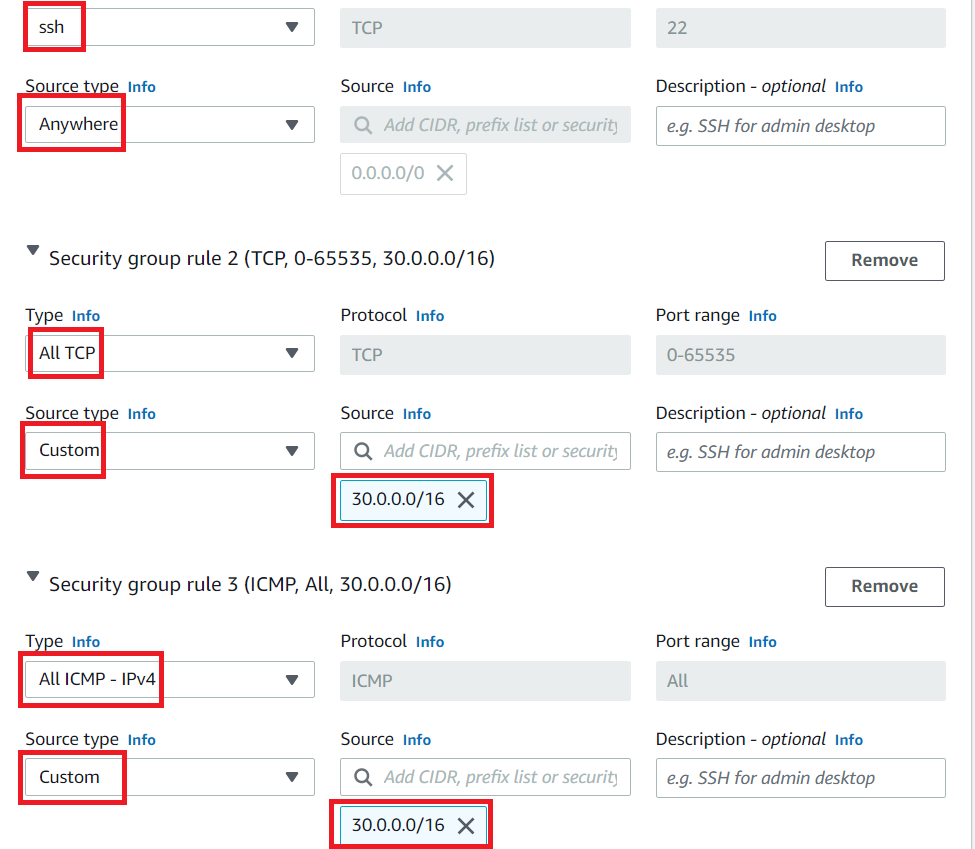
- Note : we will be allowing SSH port from anywhere (Lab practice) and we are allowing all TCP and ICMP AWS side VPC in N.Virginia Region which we will create next. (30.0.0.0/16 will be the VPC CIDR)
Click on Launch Instance button.
Launch Status: Your instance is now launching, Click on the instance ID and wait for complete initialization of instance till status change to Running.

Note down the sample IPv4 Public IP Address of the EC2 instance and place it in your text editor. A sample is shown in the screenshot below.

Task 8: Create a VPC in N.Virginia Region
Click on this link https://console.aws.amazon.com/console/home?region=us-east-1# to open the N.Virginia region.
Make sure you don't close the Asia Pacific (Mumbai) Region. Maintain both regions on different tabs in your browser.
Navigate to VPC by clicking on the Services menu in the top, then click on VPC in the Network & Content Delivery section.
Navigate to Your VPC new on the left panel and click on the Create VPC
Select VPC Only
Name tag : Enter AWS_Network
IPv4 CIDR block : Enter 30.0.0.0/16
Leave everything else as default and click on the Create VPC
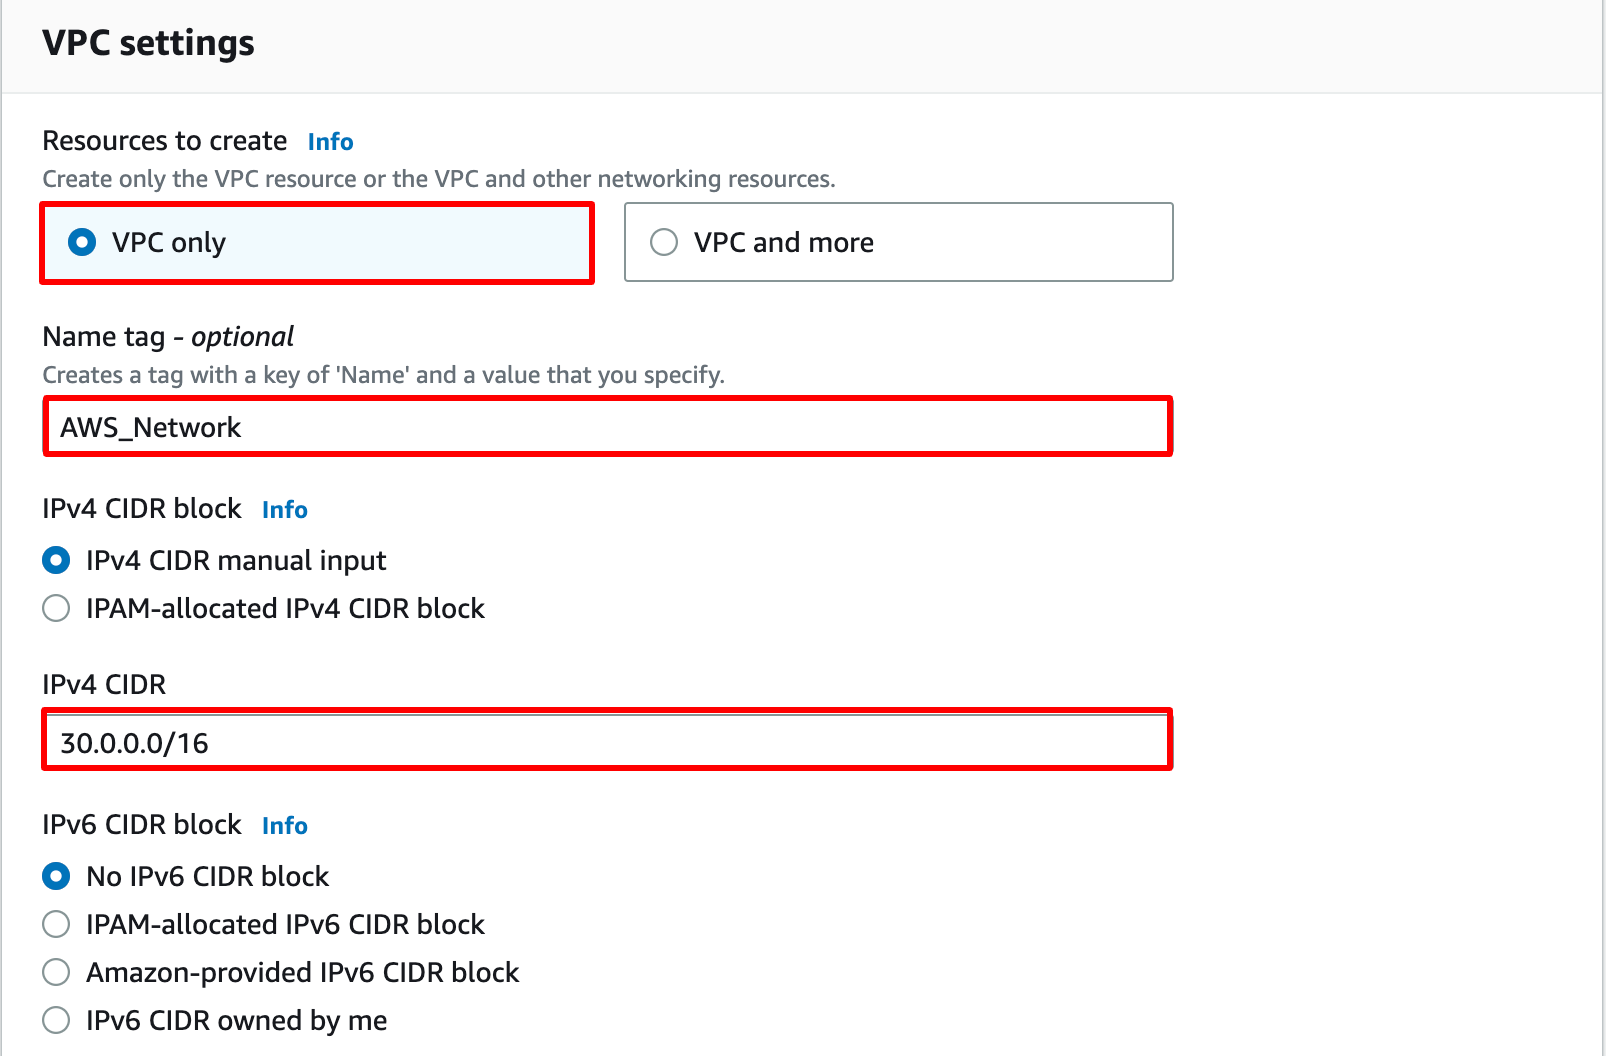
You have successfully created the VPC

Task 9: Create a Private subnet
Navigate to Subnets new from the left side menu and click on Create Subnets
VPC ID : Select the AWS_Network VPC from the list.
Subnet name : Enter Private_subnet
Availability Zone : select us-east-1a
IPv4 CIDR block : Enter 30.0.1.0/24
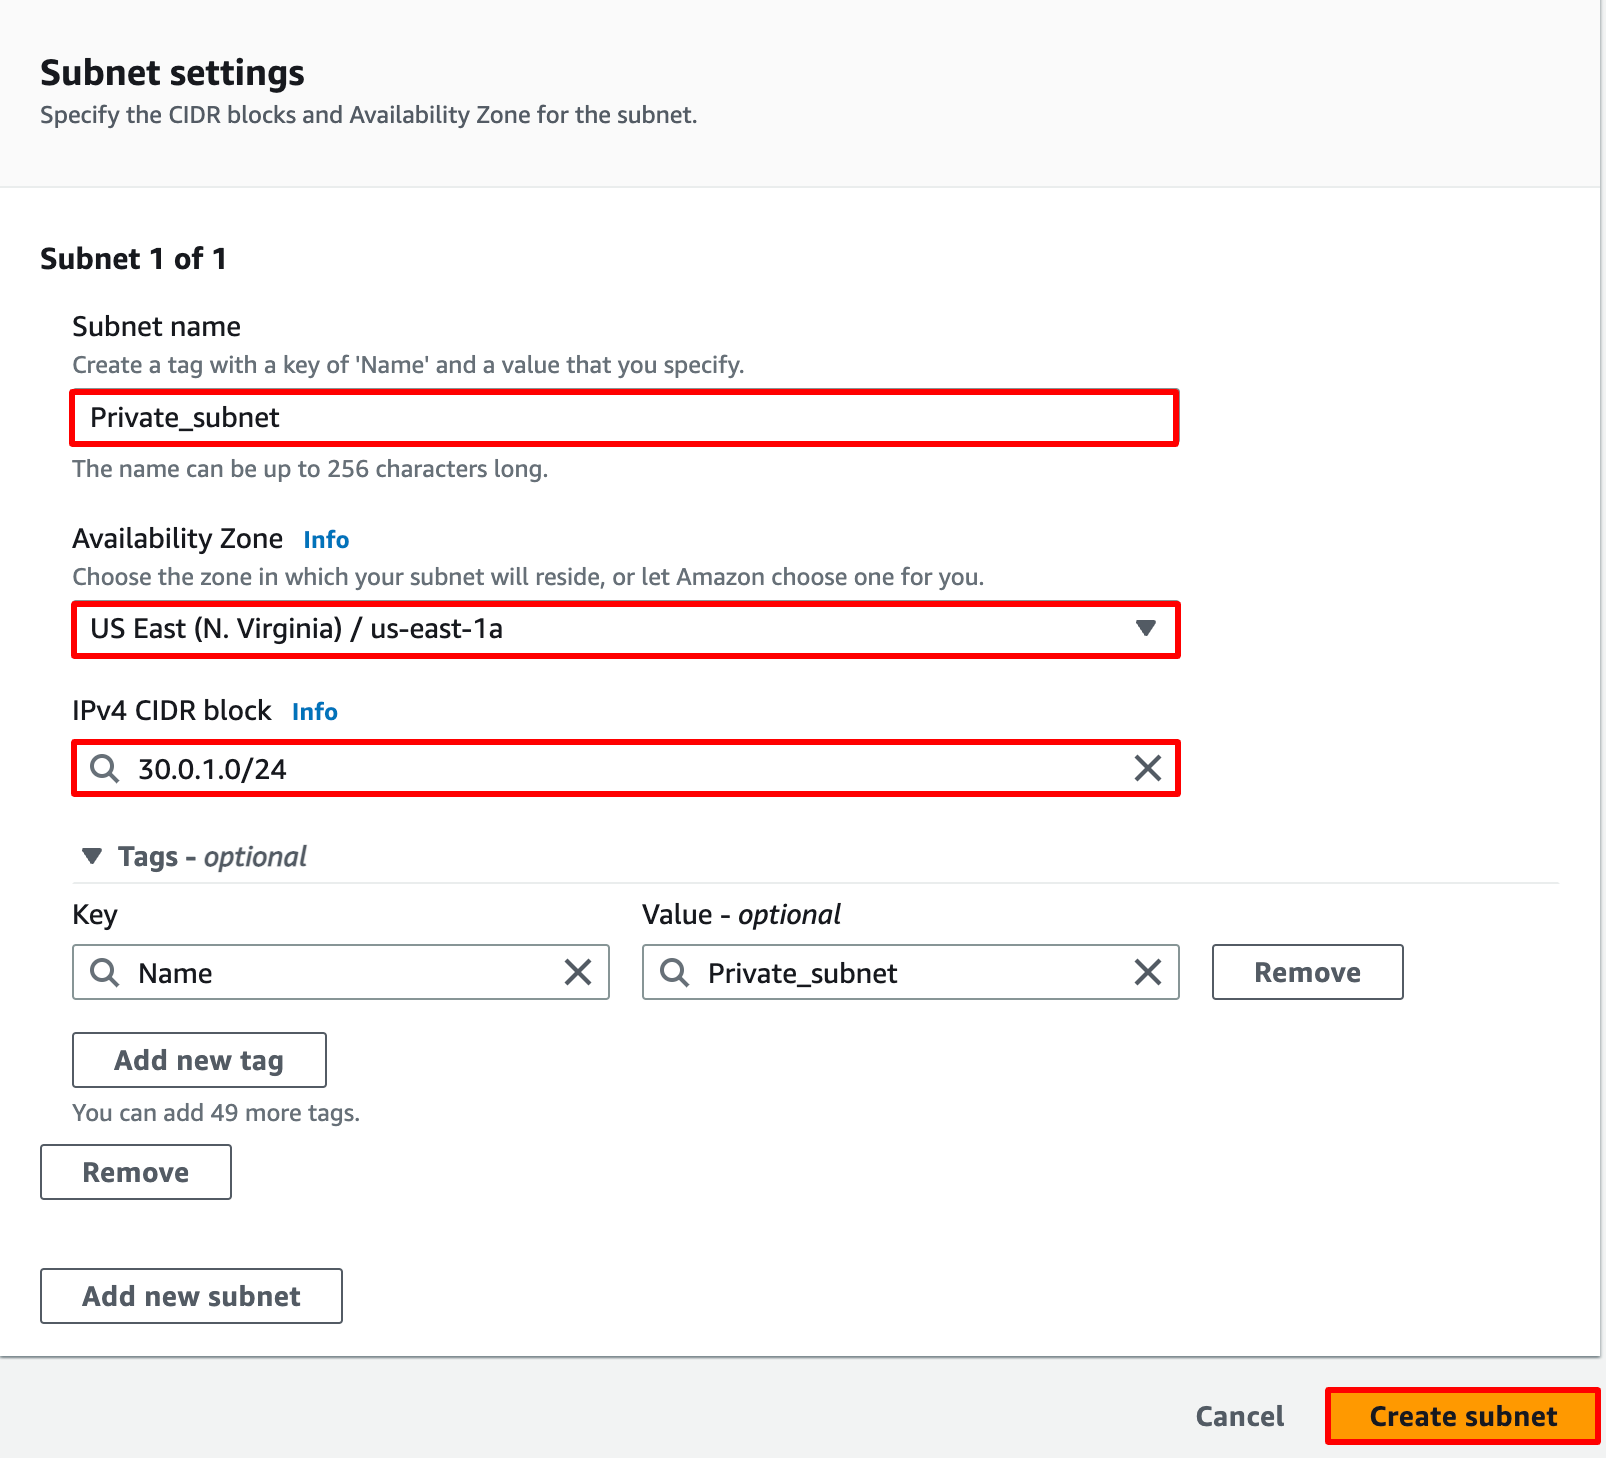
Now click on the Create Subnet

Task 10: Launch an EC2 instance
Make sure you are in the N.Virginia Region.
Navigate to EC2 by clicking on the Services menu in the top, then click on EC2 in the Compute section.
Navigate to Instances new from the left side menu and click on Launch Instances
Enter Name as AWS_EC2
Choose an Amazon Machine Image (AMI): Search for Amazon Linux 2 AMI in the search box and click on the select button.

Choose an Instance Type: select **t2.micro
**

Key Pair : Choose Create a new key Pair from the dropdown list.
Key pair name : Enter public-key
Key Pair Type: Select RSA
Click on Create key pair button to download the key to your local machine.
Under Network Settings, click on Edit button.
Network : Select AWS_Network
Subnet : leave as default
Auto-assign Public IP : Select Disable
Configure Security Group:
Firewall(security groups) : Select Create a new security group
Security group name : Enter AWS_EC2_SG
Description : Enter Security group for public Router
To add SSH,
Choose Type: SSH
Source: Anywhere (From ALL IP addresses accessible).
For All TCP,
Click on Add Security group rule button.
Choose Type: All TCP
Source: Custom and Enter10.0.0.0/16 in the textbox.
For IPv4 ICMP,
Click on Add Security group rule button.
Choose Type: All ICMP - IPv4
Source: Custom and Enter10.0.0.0/16 in the textbox.

Click on Launch Instance button.
Launch Status: Your instance is now launching, Click on the instance ID and wait for complete initialization of instance till status change to Running.

Since this EC2 is created in a private subnet, the machine will only have Private IP so, note down the sample IPv4 Private IP Address of the EC2 instance. A sample is shown in the screenshot below.

Task 11: Create a Customer Gateway in N.Virginia Region
Now navigate to the other browser tab, in which N.Virginia region is used.
Navigate to VPC by clicking on the Services menu in the top, then click on VPC in the Network & Content Delivery section.
Now scroll down and select Customer Gateway under Virtual Private Network (VPN).
Click on the Create Customer Gateway
Name : Enter On_Premises_Network_Gateway
IP Address : Enter On-premises EC2 instance IPv4 Public IP (EC2 act as the Public Router in Mumbai Region)
Leave everything else as default.
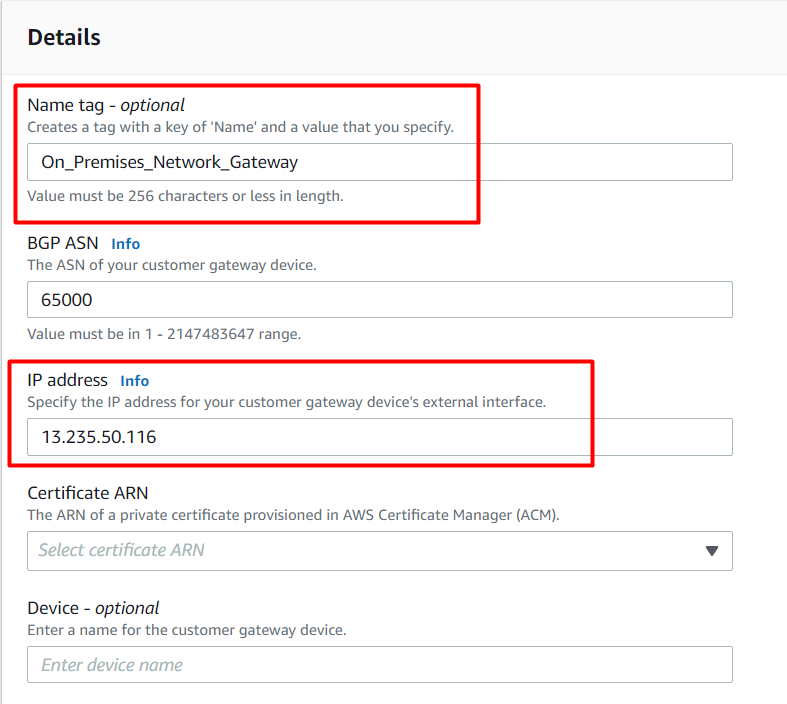
- Click on the Create Customer Gateway

Task 12: Create a Virtual Private Gateway in N.Virginia Region
Now scroll down and select Virtual Private Gateways under Virtual Private Network (VPN).
Click on the Create Virtual Private Gateway
Name tag : Enter AWS_Network_VPG
ASN : Leave as Default
Now click on the Create Virtual Private Gateway
Now the state will be detached for the Virtual Private gateway that you have created.

Now you need to attach the VPG to the VPC that you have created in the same region.
Select the Virtual Private gateway that you just created, click on the Actions button and select Attach to VPC.
VPC : Select AWS_Network from the list.
Now click on the Attach to VPC
Now wait for a few seconds and refresh the aws console by clicking on the Refresh button and the state will be attached.

Task 13: Create a Site-to-Site VPN connection
Now scroll down and select Site-to-Site VPN Connections under Virtual Private Network(VPN).
Click on the Create VPN Connection
Note : If you see any error in this page, kindly neglect it.
Name tag : Enter AWS_On_Premises_Connection
Virtual Private Gateway* : Select AWS_Network_VPG from the list.
Customer Gateway ID* : Select On_Premises_Network from the list.
Routing Options : Select Static
Static IP Prefixes : Enter 10.0.0.0/16 in the textbox (Your On-Premises VPC CIDR)
Tunnel Options :
Leave as default.
Info : The VPN creates 2 tunnels for High Availability and it uses IPSec Secure protocol to establish the connection. AWS will generate a pre shared key or you can add your own key. In this lab we will be using the key generated by AWS.
Now click on the Create VPN Connection
Now it will take 3 to 4 Minutes to set up the VPN Connection.

Select the VPN Connection and on top, click on the Download the configuration to download the config file which you need to add to the EC2 instance which you're using as Public Router in Mumbai Region.
Vendor : Select Openswan
Platform : Select Openswan
Software : Leave default.
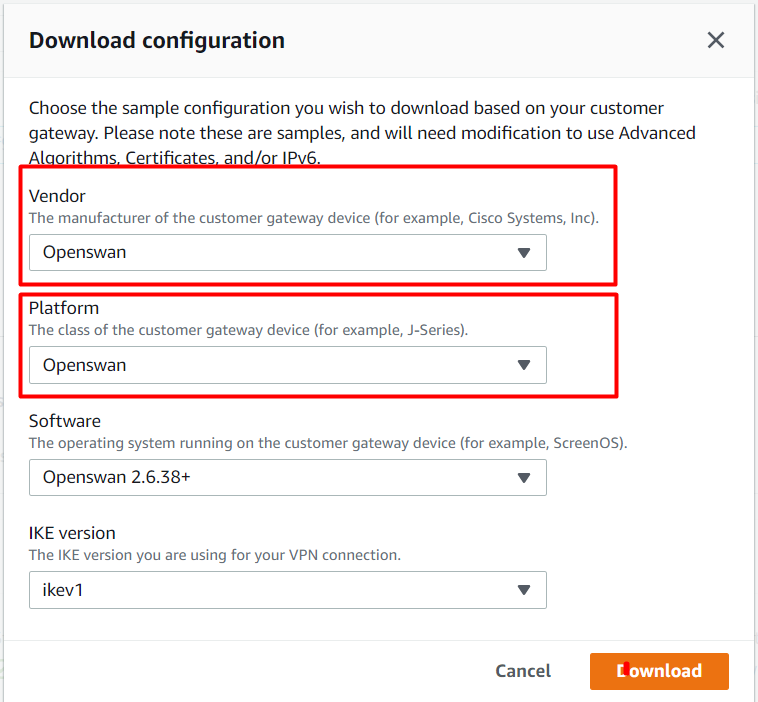
Now click on the Download button and the configuration file will be downloaded to your local machine and note down the file name. Once done click on the close or cancel button.
Now Navigate to the Tunnel Details tab and you will be able to see that both tunnels are in down state, Next we are going to make the status as UP.
Task 14: Configure On-Premises Router
You need to SSH into the EC2 instance (On_Premises_Router) that you have created in the On_Premises_Network VPC that you have created in the Mumbai Region. This EC2 will act as the Public Router of On-Premises Network.
Previously when the EC2 instance was launched, you have noted down the public IPv4 IP and if not navigate to the Mumbai region browser tab and copy the public IPv4 address.
Key Pair name as per the lab : Router-key
Please follow the steps in SSH into EC2 Instance.
Once you have successfully SSH in to EC2, run the following commands :
Switch to root user :
sudo -s
Install Openswan
yum install openswan -yNext make sure the last line in /etc/ipsec.conf is not commented. (NO # in the beginning)
nano /etc/ipsec.conf- Scroll to the end and make sure the last line include /etc/ipsec.d/*.conf has no hash (#) in the beginning.

- Click [Control] + X or [Ctrl] + X to exit the file.
Update /etc/sysctl.conf file
nano /etc/sysctl.conf- Add the below 3 lines in end of this file with no hash (#) in the beginning and add each in new lines
net.ipv4.ip_forward = 1 |

Click [Control] + X or [Ctrl] + X to exit the file.
Save modified buffer? (Answering "No" will DISCARD changes.) : Enter Y
File Name to Write: /etc/sysctl.conf : Hit [Enter] Key
Restart Network Service
service network restartNext we need to configure IPSec and pre-shared keys in Openswan.
For that you have downloaded a configuration file from the Site-to-site VPN page to your local system. Open that file in your text editor.
Create or open /etc/ipsec.d/aws.conf file
vi /etc/ipsec.d/aws.conf- In the Configuration file, look for point number 4 under IPSEC Tunnel #1 and copy the entire code below point number 4.
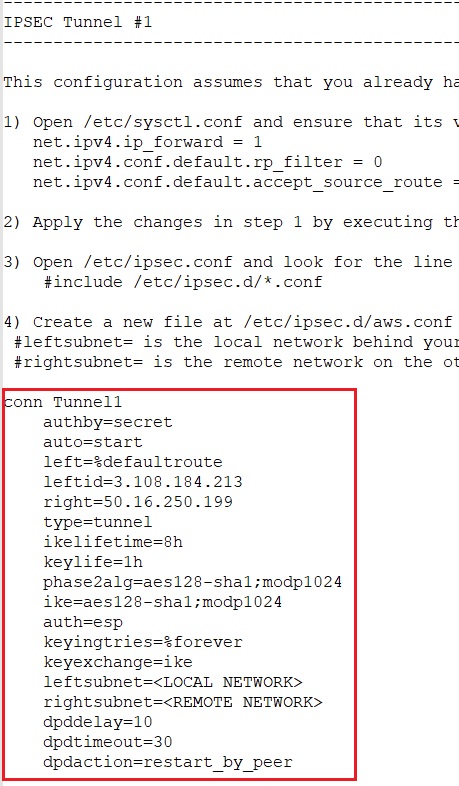
Press " i " button in your keyboard to edit the file you have created.
Paste the code in the file we opened.
Note: While pasting the code please remove white spaces at end of each line as well as replace the white spaces in the beginning of each line with tab space. If this is not followed the ipsec service won’t work
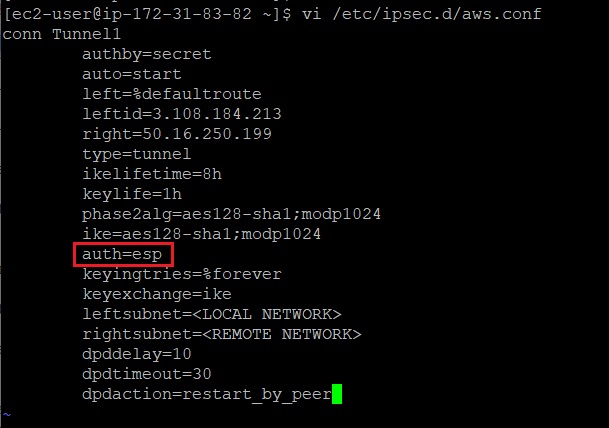
Remove the line auth=esp from the file (else the connection won't work)
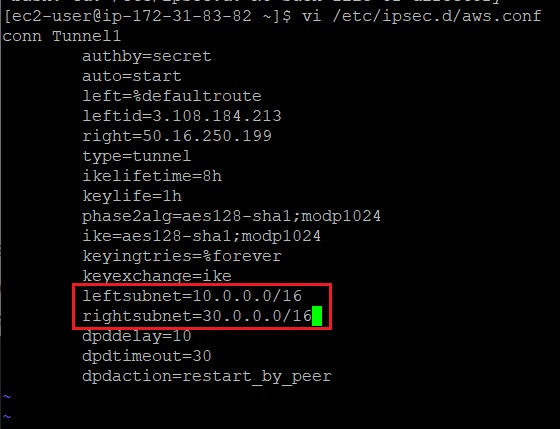
Update leftsubnet and rightsubnet
leftsubnet= Enter 10.0.0.0/16 (On-premises VPC CIDR)
rightsubnet= Enter 30.0.0.0/16 (AWS VPC CIDR)
Click [Esc] button in the keyboard to exit the editing mode.
Now type :wq and hit [Enter] Key to save the file.
Create or open /etc/ipsec.d/aws.secrets file
vi /etc/ipsec.d/aws.secrets- In the Configuration file, look for point number 5 under IPSEC Tunnel #1 and copy the entire code below.
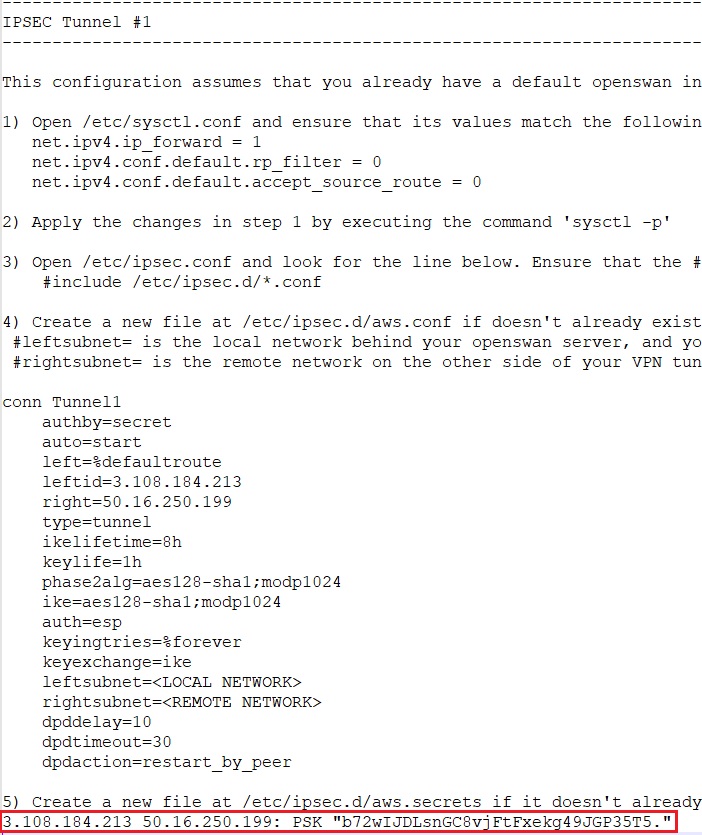
Press " i " button in your keyboard to edit the file you have created.
Paste the secret key in the file you opened.

Click [Esc] button in the keyboard to exit the editing mode.
Now type :wq and hit [Enter] Key to save the file.
Note : we will not be using IPSEC Tunnel #2 in this lab because Openswan only supports 1 tunnel. If you're using Cisco, Palo Alto, Fortinet Routes you will have an option to add the Tunnel 2.
Now Navigate to N.Virginia Region and goto VPC Console.
Navigate to Route Table from the left side menu.
Now select the RouteTable, where VPC is mentioned as AWS_Network.

Now Goto the Route propagation tab below and click on the Edit route propagation button.
Check the Enable checkbox and click on the Save button.

In case if your EC2 Session gets timed out. please follow the steps to SSH into EC2 Instance again.
Switch to root user :
sudo -s
Start IPSec service
systemctl start ipsecCheck the status of IPSec
systemctl status ipsec

Task 15: Test the connectivity between two Networks
Now you have already copied the Private IPv4 address of the EC2 instance (AWS_EC2) that you created in the Private Subnet of N.Virginia Region VPC.
In case if your EC2 Session gets timed out. please follow the steps to SSH into EC2 Instance again.
Ping the private EC2 from the Public EC2 Instance which acts as Public Router in Mumbai Region.
Syntax : ping <Private IPv4 Address>
Example : ping 30.0.1.31
Now You can see we are able to ping an EC2 in a Private subnet from a Public Subnet where both EC2’s are in different VPC(Network).

If you are able to ping the private EC2 instance in a different VPC, that means a connection is established between both VPC's. i.e VPN.
Now scroll down and select Site-to-Site VPN Connection under Virtual Private Network(VPC).
Check the Tunnel Details and you will be able to see that Tunnel 1 is UP. Tunnel 2 is Down because in Openswan only one tunnel can be configured and we only used Tunnel 1. (If the status is still DOWN wait for a few minutes to reflect the status in the AWS Management console). Wait till the Tunnel is UP.
Note : if no traffic is flowing from On-premises network to AWS Cloud network, then the VPN tunnel will go down. So always use a keep alive, wait or something else to keep the connection active.
Do You Know ?
When setting up a Site-to-Site VPN connection between your on-premises network and your Amazon Virtual Private Cloud (VPC), AWS allows you to use BGP for dynamic routing over the VPN tunnel. BGP is an exterior gateway protocol widely used in the networking industry for exchanging routing information between different autonomous systems (AS).
Task 16: Validation Test
Once the lab steps are completed, please click on the Validation button on the right side panel.
This will validate the resources in the AWS account and displays whether you have completed this lab successfully or not.
Sample output :

Task 17: Delete AWS Resources
Deleting EC2 Instance in N.Virginia region
Make sure you are in the US East (N. Virginia) Region.
Navigate to EC2 by clicking on the Services menu in the top, then click on EC2 under Compute section.
Now select the EC2 instance that you have created, click on Instance State and click on the Terminate instance option.
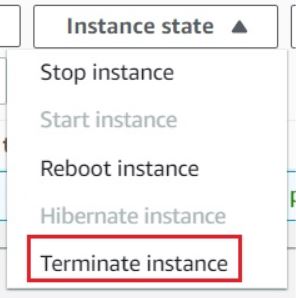
- Click on Terminate button and your EC2 will start terminating.
Deleting EC2 Instance Mumbai region
Make sure you are in the Asia Pacific (Mumbai) Region.
Navigate to EC2 by clicking on the Services menu in the top, then click on EC2 under Compute section.
Now select the EC2 instance that you have created, click on Instance State and click on the Terminate instance option.

- Click on Terminate button and your EC2 will start terminating.
Completion and Conclusion
You have successfully created a VPC in the Mumbai Region.
You have successfully created a Public subnet.
You have successfully created and attached an Internet Gateway.
You have successfully created a Public Route Table and associated it with the subnet.
You have successfully added the public Route in the Route table.
You have successfully launched an EC2 instance.
You have successfully created a VPC in N.Virginia Region.
You have successfully created a Private subnet.
You have successfully launched an EC2 instance.
You have successfully created a Customer Gateway in N.Virginia Region.
You have successfully created a Virtual Private Gateway in N.Virginia Region.
You have successfully created a Site-to-Site VPN connection.
You have successfully configured On-Premises Router.
You have successfully tested the connectivity between two Networks.
End Lab
Sign out of AWS Account.
You have successfully completed the lab.
