Create Your Own Virtual Cloud with PROXMOX: Transforming Your Server Infrastructure
Table of contents
Introduction
Proxmox Virtual Environment stands as a comprehensive and open-source server management solution designed for enterprise-level virtualization. It seamlessly combines the KVM hypervisor and Linux Containers (LXC), along with software-defined storage and networking capabilities, all within a unified platform. This integrated system features a web-based user interface, facilitating the effortless management of virtual machines (VMs) and containers. It further supports high availability for clusters and incorporates user-friendly disaster recovery tools, providing a streamlined and efficient management experience.
This guide will concentrate on installing Proxmox VE on your hardware and creating your first virtual machine. Later, we’ll briefly discuss the features provided by Proxmox.
Getting Started
Recommended Hardware
CPU: 64bit (Intel EMT64 or AMD64); Intel VT/AMD-V capable
Memory: Minimum 4GB; Recommended 8GB
Storage: Fast and redundant storage, best results with SSD disks.
Network: Gigabit LAN (10Gbit is also supported)
Prepare a USB Flash Drive as Installation Medium
Download the installer ISO image (you can choose the latest one) from: https://www.proxmox.com/en/downloads/proxmox-virtual-environment/iso

For this process, you’ll need a minimum of a 2GB USB Flash Drive. I suggest using the user-friendly program called ‘Balena Etcher’. Just drag the ISO image onto the program, choose the USB drive from the menu, click ‘flash,’ and you’re done!
Installation
Before starting, ensure that secure boot is disabled in the BIOS. Connect your hardware to the network router via Ethernet. Now, boot into the Proxmox 8.0 installer from the boot menu by selecting the USB drive as the boot option.
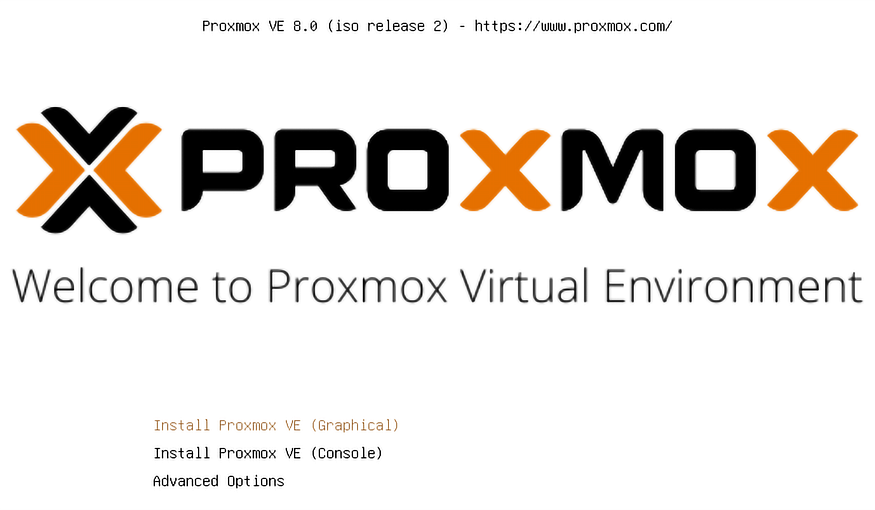
Choose ‘Install Proxmox VE (Graphical)’ and accept the end-user license agreement. Select the target storage disk(s) — the default file system is ext4, and if ext4 or xfs is chosen, the Logical Volume Manager (LVM) is used. Pick the storage drive for Proxmox VE installation and click ‘Next.’
For those opting to install Proxmox VE on ZFS, which is suitable for systems lacking a hardware RAID controller, select the target disks in the Options dialog. Advanced ZFS settings can be adjusted under ‘Advanced Options.’
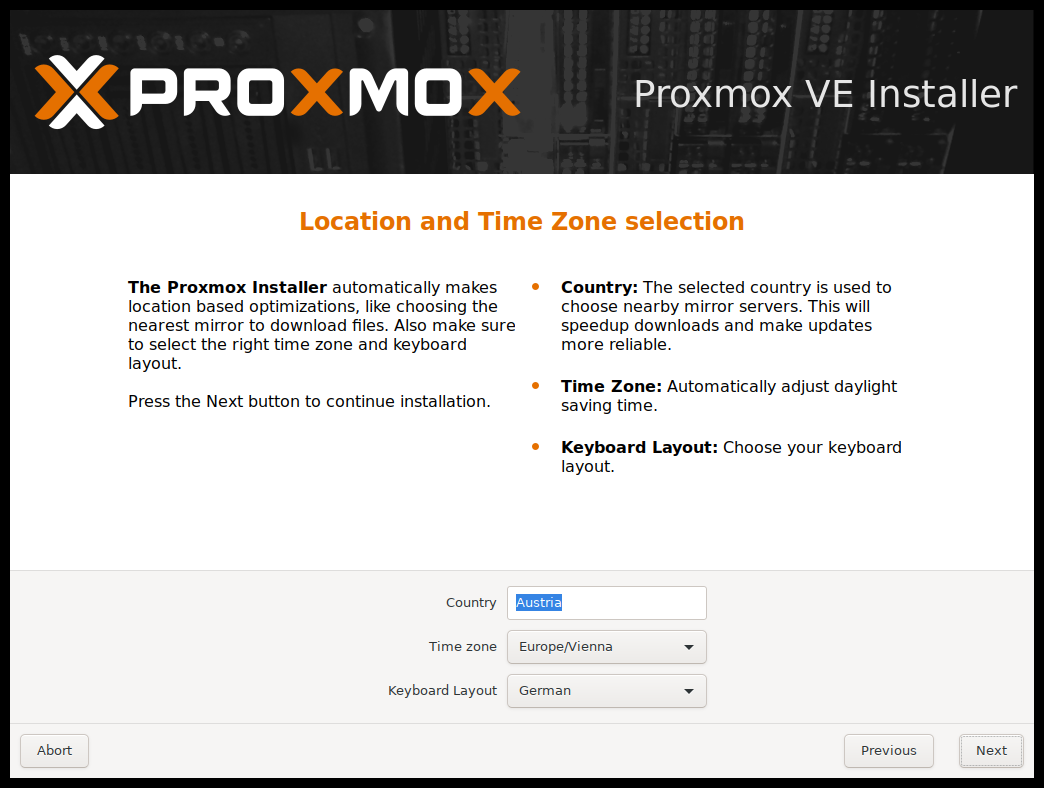
On the next page, input basic configuration details like location, time zone, and keyboard layout. The location helps choose a nearby download server for faster updates. Usually, these settings are auto-detected, needing adjustment only if auto-detection fails or a different keyboard layout is desired.
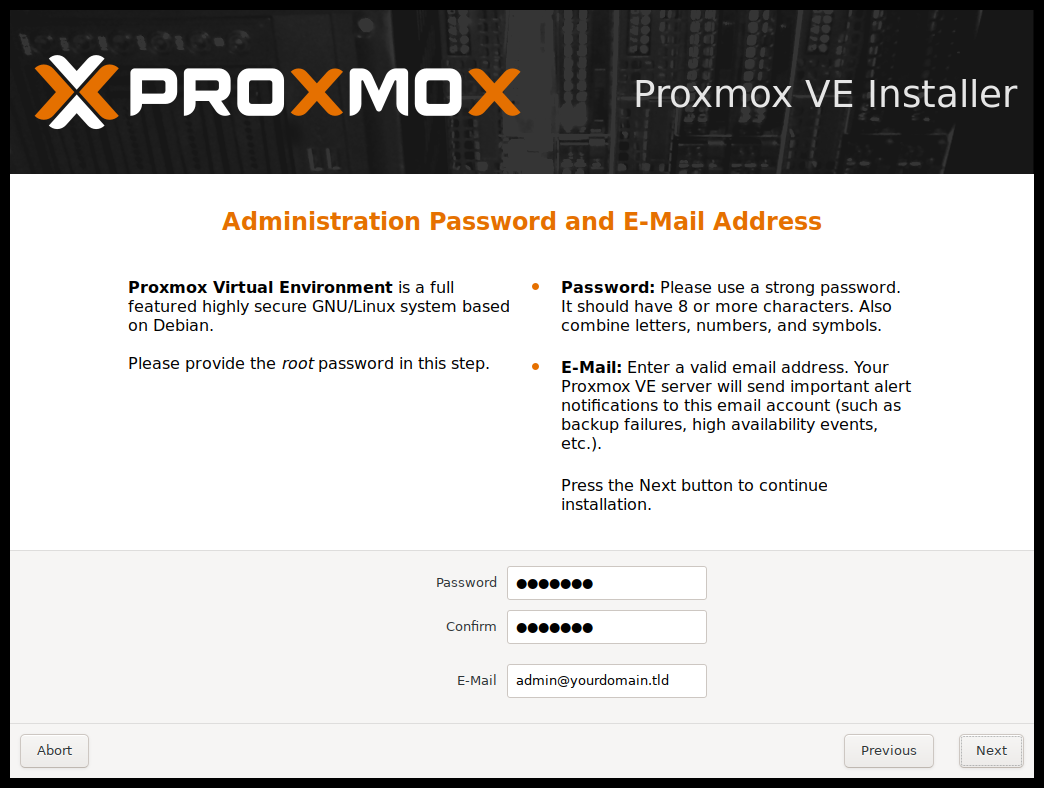
The following step involves setting the password for your admin credentials and providing an email address for notifications.
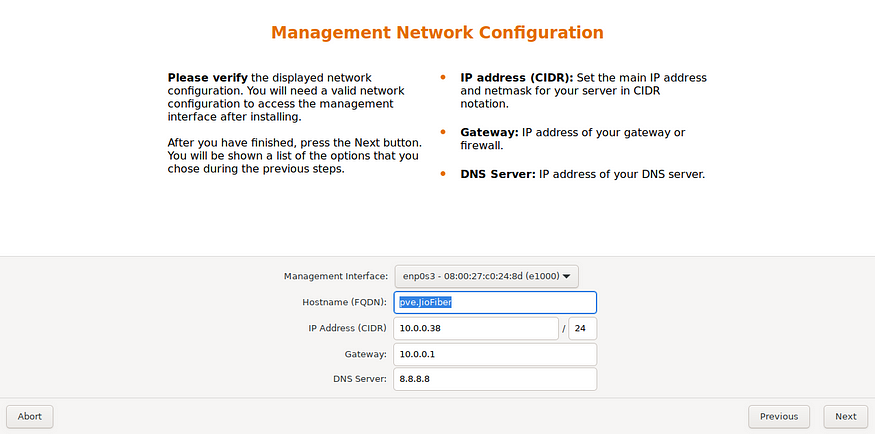
In the last step, configure the network settings. During installation, you can choose either an IPv4 or IPv6 address, but not both. For a dual-stack node, add extra IP addresses after installation.
Proxmox must have a static IP at all times and needs to be connected to your router via Ethernet to function. During initial setup, Proxmox will automatically obtain an IP from your DHCP server. Enter the desired hostname and click ‘Next.
The following step displays a summary of the previously chosen options. Double-check each setting, and use the ‘Previous’ button if any adjustments are needed. To proceed, click ‘Install.’ The installation begins, formatting disks and copying packages to the target. Please wait until this process is complete, then remove the installation medium and restart your system.
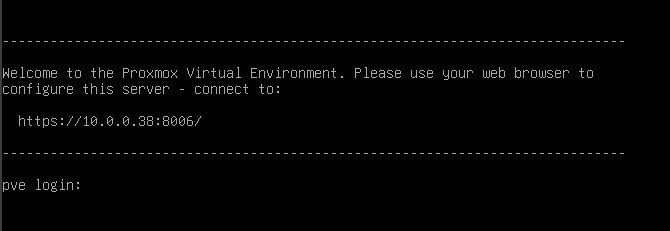
If you encounter this screen, congratulations on successfully installing Proxmox VE on your hardware. Further configuration will be carried out through a web browser using the IP address — in my case, it is 10.0.0.38:8006.
To access the interface, ensure you are on the same network as Proxmox. Connect to the network via Wi-Fi on a chosen computer, open your preferred browser (I am using Google Chrome), enter the IP address, and log in using the credentials: Username ‘root’ and the password set during the Proxmox installation.
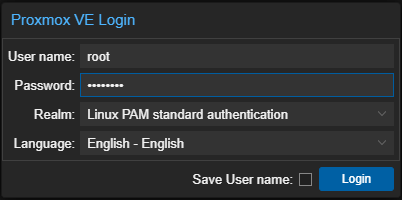

A dialogue box appears, indicating there is no valid subscription for the server. Proxmox provides an optional add-on service for subscription. To disregard the message, click OK. You should now have access to the interface.
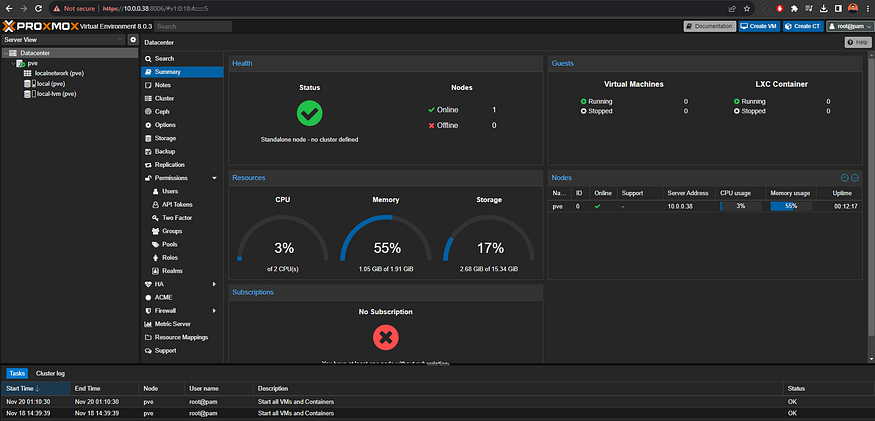
Creating your first Virtual Machine
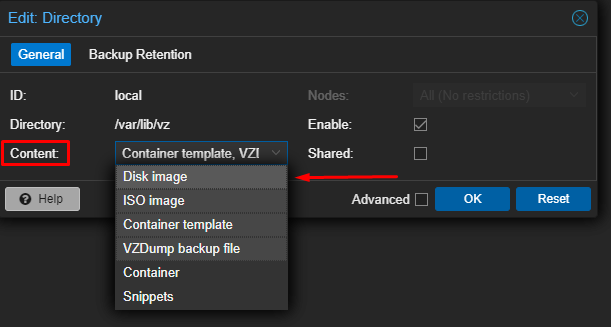
In this guide, we will install Linux Mint on our Proxmox. Initially, we need to adjust a setting to allow installation from ISO images in Proxmox. Follow the steps in the images to enable this option.
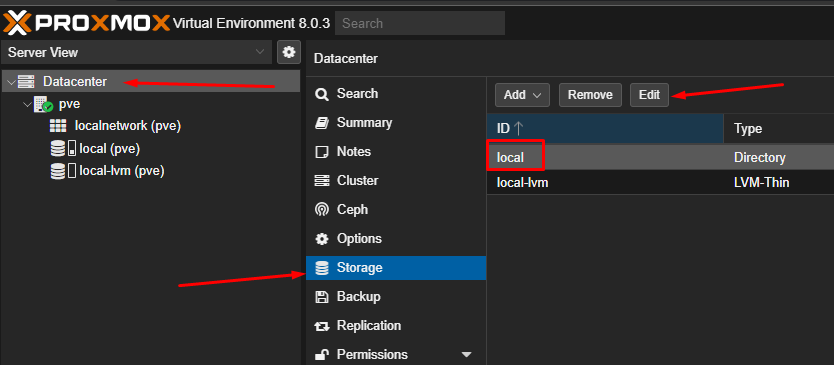
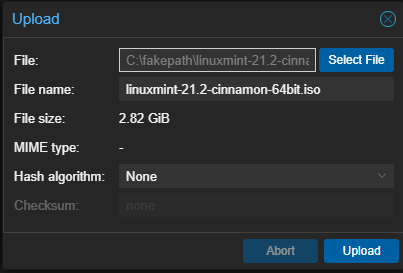
I’ve already downloaded the ISO from the Linux Mint website. To upload the ISO, follow these steps.

After uploading the ISO image, proceed by clicking on ‘Create VM’ in the top right corner of the web GUI.
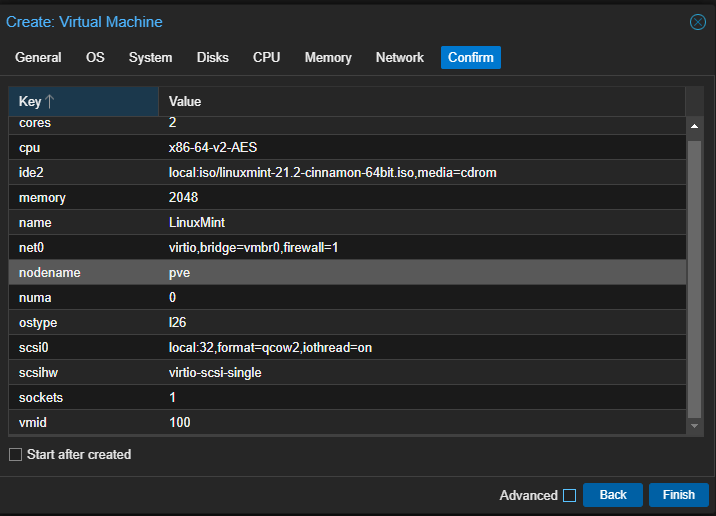
Provide a name for your Virtual Machine, choose the ISO image, leave system settings at default, select storage amount (check ‘Discard’ for SSDs), determine the number of cores and memory, keep network settings default, review the VM summary, and click ‘Finish’.
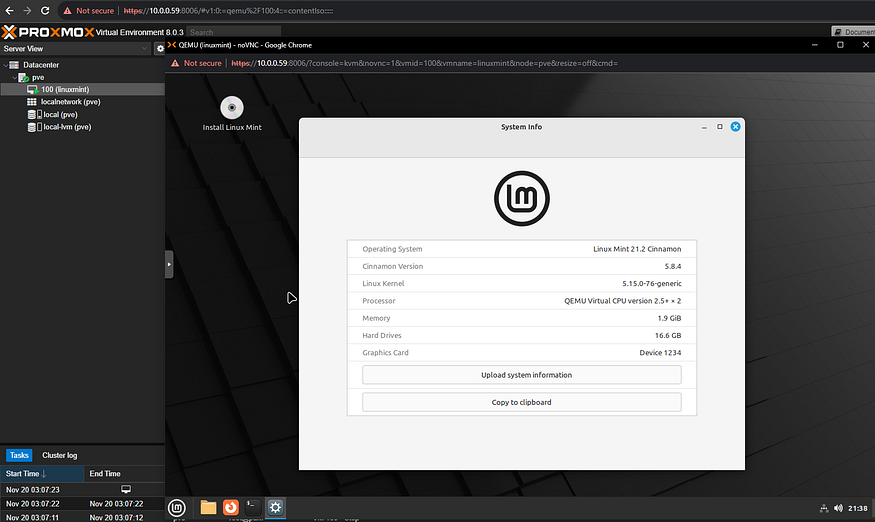
The VM should appear in the resource tree on the left side of the screen. Double-click on the VM to launch it, wait for it to boot up, and there you have it — Linux Mint inside Proxmox.
Now, you might be curious about the additional features that Proxmox provides. Let’s briefly discuss them.
Exploring Proxmox Features
Server Virtualization
Proxmox Virtual Environment (Proxmox VE) is an open-source server virtualization platform based on Debian GNU/Linux. It supports Kernel-based Virtual Machine (KVM) for full virtualization, accommodating both Windows and Linux VMs. Additionally, Proxmox VE incorporates Linux Containers (LXC) for lightweight, kernel-sharing virtualization. The source code is freely available, encouraging community contributions and ensuring reliability and security. Proxmox VE has been KVM-compatible since its inception in 2008. The platform facilitates the creation of agile and scalable software-defined data centers.
Central Management
Proxmox VE provides centralized management through a web interface, accessible via CLI or REST API for automation. The user-friendly GUI covers all functions, while mobile access is available through an Android app or HTML5-based mobile web interface. Advanced users can utilize the command line interface (CLI) with intelligent tab completion. Proxmox VE’s RESTful API, using JSON, ensures easy integration with third-party tools for customized hosting environments.
Kubernetes Cluster
Proxmox provides a robust environment for deploying and managing Kubernetes clusters, offering a seamless integration of virtualization and container orchestration. Leveraging Proxmox’s virtualization capabilities, users can create and scale virtual machines to host Kubernetes nodes efficiently. The synergy between Proxmox’s intuitive interface and Kubernetes’ powerful container orchestration allows for streamlined deployment and management of containerized applications. With Proxmox, users can harness the benefits of Kubernetes clusters, such as scalability, flexibility, and resource efficiency, while maintaining the simplicity of Proxmox’s virtualized infrastructure. This integration enhances the overall experience of utilizing Kubernetes within the Proxmox environment, making it a versatile solution for orchestrating containerized workloads.
Clustering
Proxmox VE scales from a single node to a large clustered setup, seamlessly integrating its cluster stack upon installation. Unique to Proxmox, the Proxmox Cluster File System (pmxcfs) synchronizes configuration files across nodes in real-time using Corosync. This database-driven file system ensures data consistency and resilience.
Proxmox VE stands out as the sole virtualization platform utilizing pmxcfs. The platform supports live/online migration, allowing administrators to move running virtual machines between cluster nodes without downtime. With a unique multi-master design, maintenance tasks can be performed cluster-wide from any node, streamlining management through the integrated web interface. This eliminates the need for a separate, complex, and costly management server.
Authentication
Proxmox VE features role-based administration for precise control over object access, using a permission system similar to access control lists. It supports multiple authentication sources, including Linux PAM, an integrated Proxmox VE server, LDAP, Microsoft Active Directory, and OpenID Connect, offering flexibility in user authentication.
Proxmox VE High Availability (HA) Cluster
Proxmox VE’s High Availability (HA) Cluster ensures dependable virtual servers using Linux HA technologies. Easily configured through the web interface, it includes the Proxmox VE HA Manager, automating monitoring and action for VM and container failures. The HA Manager operates seamlessly without configuration, and deployment is simplified with watchdog-based fencing. Proxmox VE features an HA Simulator for hands-on testing of a real-world 3-node cluster with 6 VMs, aiding in understanding HA functionality.
Bridged Networking
Proxmox VE utilizes a bridged networking model, allowing each host to have up to 4094 bridges, akin to virtual network switches. VMs share a bridge, simulating connections to the same switch. For external connectivity, bridges link to physical network cards with TCP/IP configurations. The system supports VLANs and network bonding for added flexibility, enabling the creation of intricate virtual networks. Proxmox VE also offers Open vSwitch (OVS) as an alternative, providing advanced features like RSTP support, VXLANs, OpenFlow, and the ability to support multiple VLANs on a single bridge.
Flexible Storage Options
Proxmox VE offers versatile storage options, allowing VM images to be stored locally or on shared storage like NFS and SAN. Users can configure multiple storage types, including network options (LVM, iSCSI, NFS, SMB/CIFS, Ceph, GlusterFS) and local options (LVM, Directory, ZFS). Shared storage enables live migration without downtime, enhancing flexibility for Debian GNU/Linux environments.
Software-Defined Storage with Ceph
Ceph, an open-source distributed object store and file system, seamlessly integrates with Proxmox VE. Proxmox allows easy management of Ceph storage directly from any cluster node. Ceph offers two storage types: RADOS Block Device (RBD) for block-level storage, and CephFS for POSIX-compliant filesystems. Benefits include simple setup and management through GUI or CLI, self-healing capabilities, scalability to the exabyte level, customizable pools for performance and redundancy, and compatibility with cost-effective hardware.
Proxmox VE Firewall
Proxmox VE Firewall safeguards your IT infrastructure with customizable rules via GUI or CLI. It allows rule setup for hosts, VMs, and containers, featuring firewall macros, security groups, IP sets, and aliases for ease. The distributed firewall, stored in the cluster file system, runs on each node, ensuring full VM isolation and higher bandwidth. Supporting both IPv4 and IPv6, the firewall filters traffic for both protocols by default, eliminating the need for separate rule sets.
Backup/Restore
Proxmox VE ensures a robust Backup/Restore solution with integrated tools for easy initiation via GUI or vzdump command line. Backups are comprehensive, capturing VM and container configurations along with all data. Scheduled backup jobs can be automated for specific nodes and guest systems. KVM live backup supports various storage types, optimizing storage efficiency.
Proxmox Backup Server Integration
Proxmox Backup Server seamlessly integrates with Proxmox VE, offering enterprise-class backup capabilities for VMs, containers, and physical hosts. The incremental backups reduce network load and backup time, with client-side encryption ensuring data security. Live-restore minimizes downtime for VMs stored on Proxmox Backup Server, allowing immediate VM startup during restoration. Additionally, the web interface facilitates secure single-file or directory restoration from VM or container backups.
Conclusion
Installing Proxmox VE provides a powerful platform for managing virtual machines and containers on your server. With its user-friendly web interface and robust features, Proxmox VE is a versatile solution for both small and large-scale virtualization deployments. Follow this simple guide, and you’ll be on your way to optimizing your server infrastructure with Proxmox VE.
