

Table of contents
- Task 1: Sign in to the AWS Management Console
- Task 2: Creating a Security group for the Load balancer
- Task 3: Steps to create the Web-servers
- Task 4: Creating a Load balancer
- Task 5: Testing the Load Balancer
- Task 6: Creating an IP set
- Task 7: Creating a Web ACL
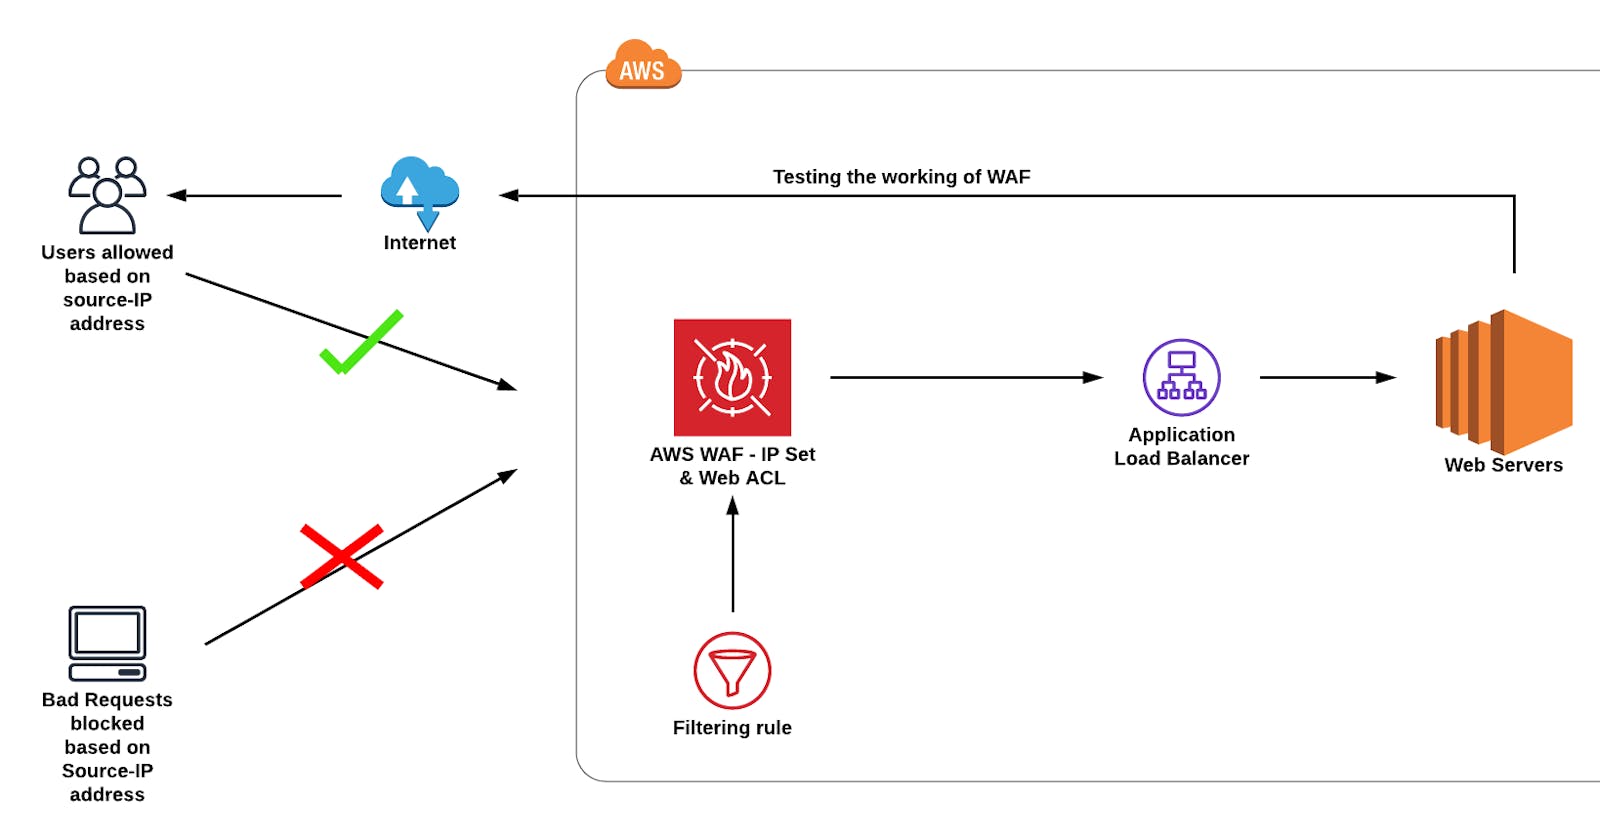
- Task 8: Testing the working of the WAF
- Task 9: Unblocking the IP
- Do you know?
- Task 10: Validation Test
- Completion and Conclusion
- End Lab
Task 1: Sign in to the AWS Management Console
Click on the open console button, and you will get redirected to the AWS Console in a new browser tab.
On the AWS sign-in page,
Leave the Account ID as default. Never edit/remove the 12-digit Account ID present in the AWS Console. otherwise, you cannot proceed with the lab.
Now copy your User Name and Password in the Lab Console to the IAM Username and Password in the AWS Console and click on the Sign in button.
Once Signed In to the AWS Management Console, Make the default AWS Region as US East (N. Virginia) us-east-1.
Select Maybe later in the New AWS Console Home page pop-up
Task 2: Creating a Security group for the Load balancer
Navigate to the EC2 Dashboard and scroll down to Security Groups. In the left menu, click on Create security group.
Configure the security group as follows:
Security group name: Enter LoadBalancer-SG
Description: Enter Security group for the Load balancer
VPC: Leave as default
In Inbound rules, Click on Add Rule and add the port as follows.
Type: Select HTTP
Protocol: TCP
Port range: 80
Source: Select Custom, and enter 0.0.0.0/0
- Once you provide the above details, click on Create and the security group for the load balancer will be created.
Task 3: Steps to create the Web-servers
Make sure you are in the US East (N. Virginia) Region.
Navigate to Instances on the left panel and click on Launch instance.
Name: Enter webserver-A
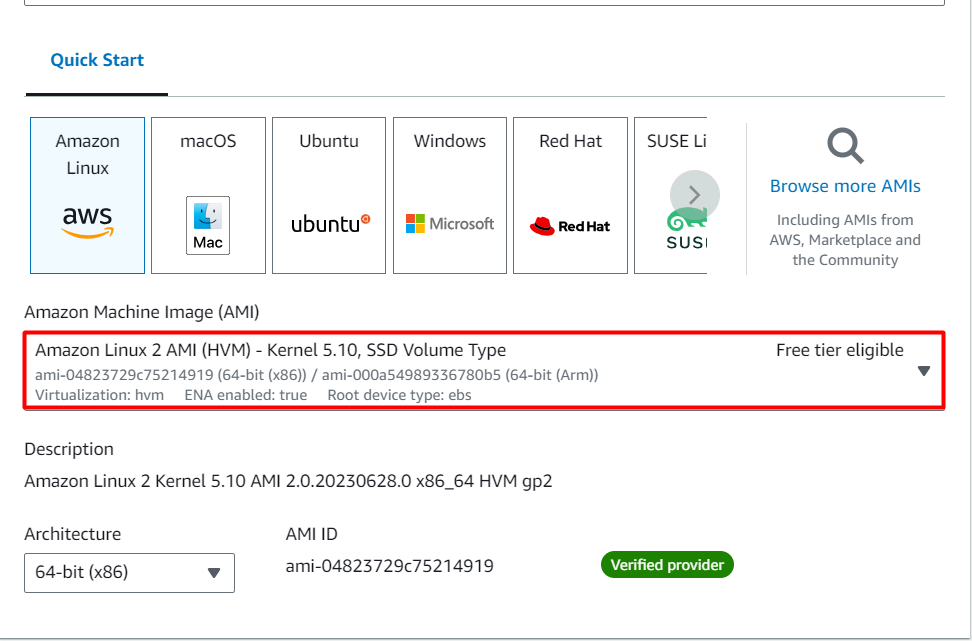
For Amazon Machine Image (AMI): Search for Amazon Linux 2 AMI in the search box and click on the select button
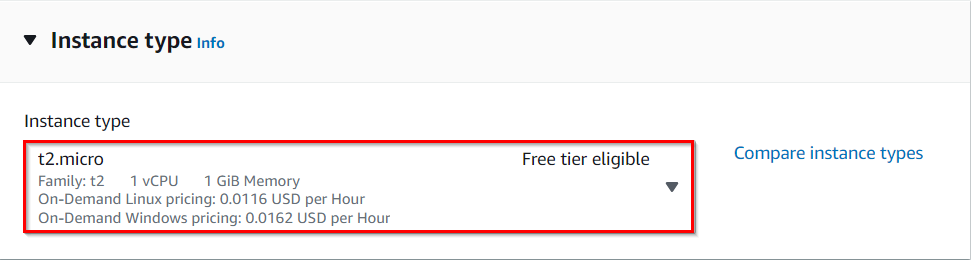
- Instance Type: Select t2.micro
For Key pair: Select Create a new key pair Button
Key pair name: WhizKey
Key pair type: RSA
Private key file format: .pem
Select the Create key pair Button.
In Network Settings Click on the Edit button:
Auto-assign public IP: Enable
Choose Create security group
Name: Enter webserver-SG
Description: Enter security group for the webserver
To add HTTP Click on Add security group rule
Choose Type: Select HTTP
Source Type: Custom
Source: Choose LoadBalancer-SG
To add SSH
Choose Type: Select SSH
Source: Choose Anywhere
Click on Advanced Details.
Under the User data section, enter the following script to create an HTML page served by an Apache HTTPD web server.
#!/bin/bash sudo su yum update -y yum install -y httpd systemctl start httpd systemctl enable httpd echo "Response coming from server A" > /var/www/html/index.htmlClick on Launch Instances.
After a few minutes, you will see a new instance named webserver-A running.
Repeat the above steps to create Webserver-B by selecting the existing security group webserver-SG providing the following details:
#!/bin/bash sudo su yum update -y yum install -y httpd systemctl start httpd systemctl enable httpd echo "Response coming from server B" > /var/www/html/index.html
- Navigate to the EC2 Dashboard to find the two instances (webserver-A and webserver-B) running.

Task 4: Creating a Load balancer
In the EC2 Console, Navigate to Target Groups, present in the left panel under Load Balancing.
Click on the Create target group.
For Step 1, Specify group details
Under Basic configurations,
Choose a target group: Choose Instances
Target group name: Enter web-server-TG
Keep all the settings as default.
Health check protocol: HTTP
Health check path: Enter /index.html
Scroll to the end of the page and click on the Next button.
For Step 2, Register targets
Select both instances and click on the Include as pending below button.
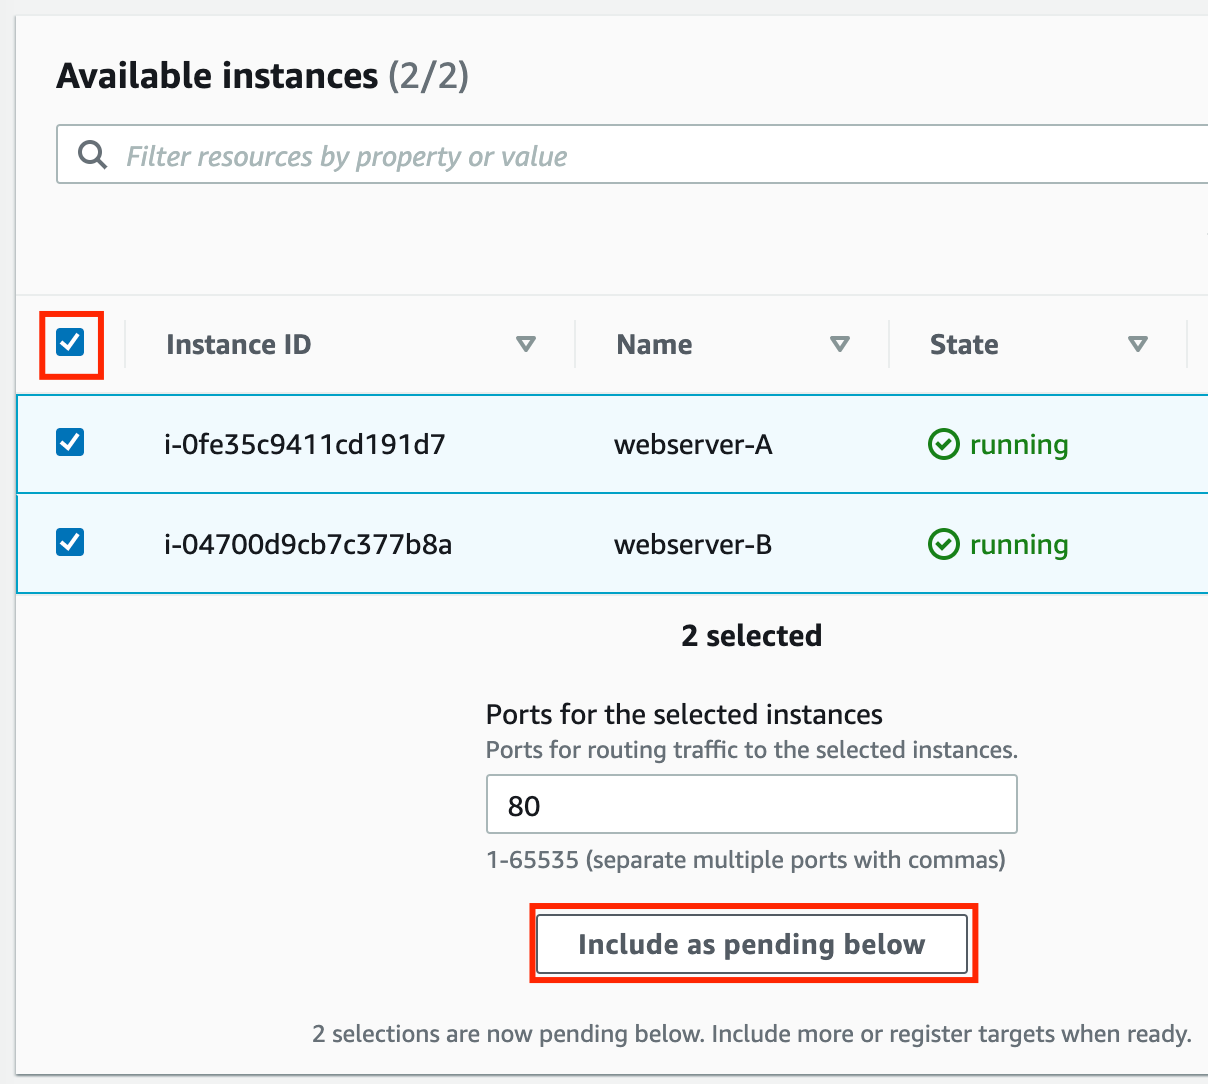
Instances will be present in the Review targets part, having health status as Pending.
Click on the Create target group button.
The Target group is now created.
In the EC2 console, navigate to Load balancers in the left-side panel.
Click on create load balancer at the top-left to create a new load balancer for our web servers.
Select Load Balancer Type: Under the Application load balancer, click on the Create button.
To create an Application load balancer, configure the load balancer as below
For the Basic configuration section,
Name: Enter Web-server-LB
Scheme: Select Internet-facing
IP address type: Choose IPv4
For the Network mapping section:
VPC: Select Default
Mappings: Select all the Availability zones present
For the Security groups section,
- Select the LoadBalancer-SG Security group from the dropdown and remove the default security group.
For the Listeners and routing section,
The listener is already present with Protocol HTTP and Port 80.
- Select the target group web-server-TG for the Default action forwards to option.
Keep the tags as default and click on the Create load balancer button.
You have successfully created the Application Load balancer. Click on the View load balancers button.
Wait for 2 to 3 minutes for the load balancer to become Active.
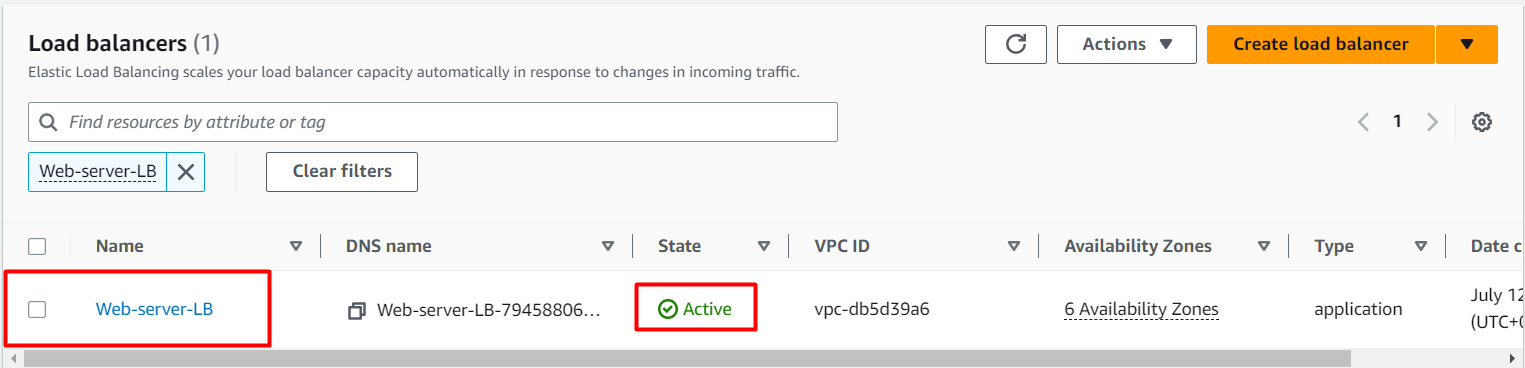
Task 5: Testing the Load Balancer
- Navigate to Load Balancers and select the load balancer that you created. Under details scroll down you will be able to see the DNS name, copy the DNS name and paste it into the browser

- Refresh the browser a few times and you will see the request is serving from both servers. You will see the output as RESPONSE COMING FROM SERVER A & RESPONSE COMING FROM SERVER B. This shows that load is shared between the two web servers via the Application Load Balancer.


Task 6: Creating an IP set
Click on services and select WAF & Shield under the Security, Identity, & Compliance section.
On the left side, you will be able to see the IP sets menu. Click on IP sets and click on Create IP sets.
On the next screen, fill out the following details under Create IP set.
IP set details:
IP set name: Enter MyIPset
Description: Enter IP set to block my public IP
Region: Select US EAST (N.Virginia )
IP Version: Select IPv4
IP address: Enter the IP of your local network/32 from https://www.whatismyip.com/.
Note: You have to give /32 after the IP is pasted or else you won't be able to create an IP set.
Once you have provided the above details, click on Create IP set
Task 7: Creating a Web ACL
- Web ACL details
Navigate to the AWS WAF dashboard and select Web ACLs. Click on Create web ACL to create a new web ACL.
Configure the ACL as below:
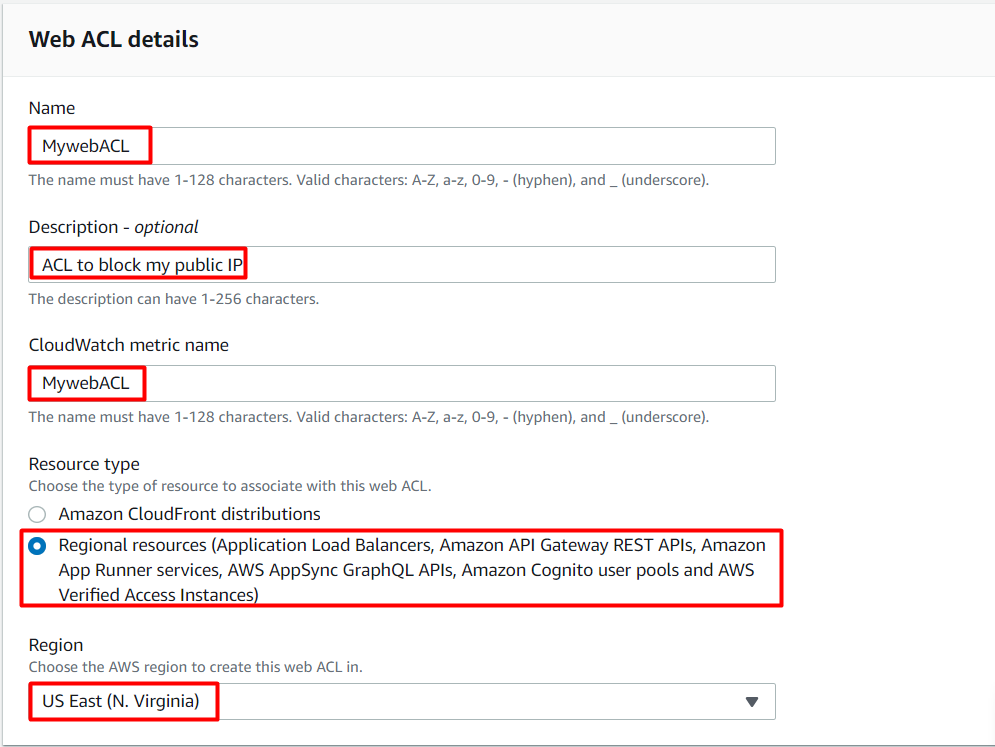
- Web ACL details
Name: Enter MywebACL
Description: Enter ACL to block my public IP
Resource type: Select Regional resources (Application Load Balancer and API Gateway)
Region: Select US EAST (N.Virginia)
To associate an AWS resource, click on Add AWS resources
In Add AWS resources select Application Load Balancer and select the name of ALB. Click on Add
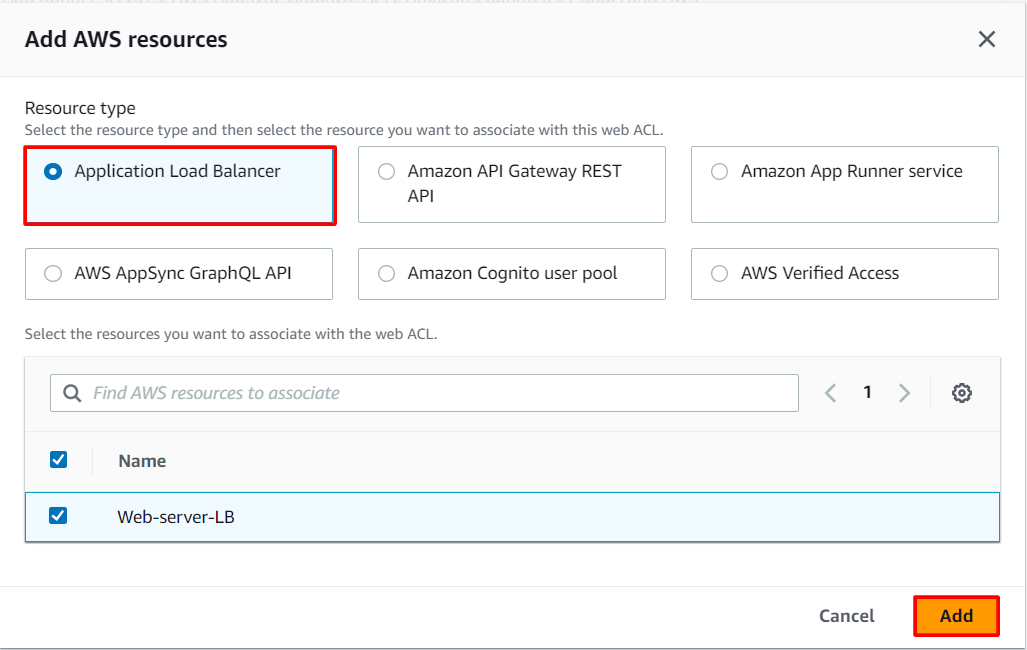
- Lastly, click on the Next button
- Add rules and rule groups
Under Rules click on Add rule and select Add my own rules and rule groups in the drop-down menu.
In Rule type select IP set as shown below and fill in the details as given below:
Rule type: Select IP set
Name: Enter MywebACL-rule
IP set: select the IP set created Above ( MyIPset )
IP address to use as the originating address: Source IP address
Action: Select Block
Once you provide the above details, click on the Add rule.
Lastly, click on the Next button
- Set rule priority
- Leave as default and click on Next.
- Configure metrics
- Leave as default and click on Next.
- Review and create web ACL
- Review all your inputs and click on Create web ACL
- Wait for 1 or 2 minutes until you will see that your web ACL is successfully created.

- You have successfully created a web ACL for ALB with the help of an IP set created with your public IP.
Task 8: Testing the working of the WAF
To test the WAF, navigate to Load Balancers from the EC2 left menu under the sub-heading Load balancing
Under the Load balancer section, select the Application load balancer Web-server-LB.
Copy the DNS name Under details scroll down you will be able to see the DNS name copy it and paste it in your desired browser.
- You will get a 403 forbidden error showing that WAF blocked your connection to ALB.

Task 9: Unblocking the IP
- To unblock the IP, navigate to IP sets and click on MyIPset. Select your public IP and then click on Delete

Type delete in the confirmation box and click on Delete.
You have successfully removed the IP from WAF.
Wait for a few minutes.
Navigate to Load Balancers from the EC2 left menu under the sub-heading Load balancing
Under the Load balancer section, select the Application load balancer Web-server-LB.
Copy the DNS name under Description and paste it into your desired browser.
- You will get the response from the web servers either stating RESPONSE COMING FROM SERVER A or RESPONSE COMING FROM SERVER B as shown below:

Do you know?
Web Application Firewall (WAF): A Web Application Firewall is a security service that sits between a web application and its users, inspecting and filtering incoming web traffic. In the context of AWS, the AWS WAF service provides this functionality. It helps protect web applications by examining HTTP/HTTPS requests and applying a set of predefined rules or custom rule configurations to block, allow, or filter traffic based on specified criteria.
Task 10: Validation Test
Once the lab steps are completed, please click the validation button on the right side panel.
This will validate the resources in the AWS account and display whether you have completed this lab successfully or not.
Sample output :

Completion and Conclusion
You have successfully created an IP set using your public IP.
You have successfully created a web ACL rule using an IP set and application load balancer (ALB).
You have successfully tested the working of the ALB after implementing a WAF, blocking the web request to the ALB from your local network.
You deleted the IP set and tested the working of the ALB.
End Lab
Sign out from the AWS Account.
You have successfully completed the lab.